Showing posts with label mommy time. Show all posts

Saturday, November 10, 2012

Back


We have arrived.

My brain is still back in Kentucky somewhere. My goals to create while I was in the car were sadly a bit ambitious. I did finish a stuffed animal that I've been procrastinating with for about 2 years.

At some point, I will get myself organized enough to take photos of all the art and crafts that I have been working on the past couple of months. It's not as much as I'd like, but it's something.

For now, where I'm putting my energy (aside from getting the kids registered in school,) is my new studio. 

This is what it looked like after I moved all the boxes from my kids' room into it.

Yipes.

Well, I had to get the kids a place to sleep, that was first on the agenda. Forget that fact that in order to put everything away, I had to get the studio in order, since it will be storage heavy. When we came back down here to Florida, we were also reunited with most of our stuff that has been in storage. I haven't even gotten through all the boxes, but I've already found so many things that are full of memories.


 Half way through. Still moving boxes and tables.

Boxes moved. Tables moved. Shelves moved. Actually thinking I want the stainless desk back on the other side. I have to experiment with it.  I am looking forward to my thrift shopping and yard saling, looking for a desk chair and a cozy armchair to go along with my soon to be desk.

I love thrift shopping. I love yard sales. I also love the art of the curb side find.


Next to the shelving unit, there is a cabinet that I think used to house an old school stereo system but which I used for my art supplies. It has a pretty inlay, but a patch of missing trim. I found it in the alley here in Florida three years ago. I almost put it back out in the alley when I moved away, but decided to hold onto it, and now I'm glad I did.

Because it turns out that my craft cabinet aka travel kitchen, which was another curbside find but in Michigan, fits perfectly on top of the hulking cabinet with the interesting inlay and curved front. Now I have a full service craft cabinet.

Well, that's one little discovery in my studio. It will make me even happier when I've filled it with all my supplies.

I kind of want to get back to work and finish fixing up the rest of my studio. I think it's time to make a space to take my art and my writing seriously. Because I am super behind in nanowrimo and super behind in my 100 in 100 days creative projects.

Sigh.

Well, like I said, back to work.

Thursday, August 23, 2012

Quick Coffee Cake with Dried Cherries

  Quick Coffee Cake with Dried Cherries

Browsing pinterest one day, I was struck with the desire to have a nice warm coffee cake for breakfast.

After a quick look at my pantry and another quick look for a bisquick coffee cake recipe or two as a guide line, this is what I came up with.

Coffee Cake

2 cups Bisquick mix (or Jiffy Buttermilk Complete)
2 eggs
1/3 cup milk
1/3 cup sour cream
1 tsp vanilla
2 TBS sugar

1/3 cup chopped dried cherries

In a large bowl, beat eggs and milk and sour cream and vanilla until smooth. Add bisquick mix and sugar, mix until just smooth. Do not over mix. Fold in chopped dried cherries.

Pour batter into a greased 9" cake pan or 8x8 square pan. Set aside while you make the topping.

Crumble Topping
1/3 cup bisquick mix
1/3 cup oatmeal
1/3 cup chopped pecans
2/3 cup brown sugar
1/2 tsp cinnamon
3 TBS melted butter

In a medium bowl, mix together the bisquik, oatmeal, chopped pecans, cinnamon and brown sugar. Pour melted butter over the topping mix and stir until the butter is mixed evenly through out.

Spread evenly on your coffee cake batter.

Bake in a preheated 400 degree oven for 24 minutes or until a tooth pick inserted in the center comes out clean.

Let cool 10 minutes. Slice and eat.


This coffee cake has a LOT of crumble. Yum. That's the way I like it, crispety, buttery sweet. The sour cream adds moisture and the cherries add a tangy sweetness. If you're a big pecan fan, you could add more chopped pecan to the batter and topping. This really isn't very pecan-y.

I think as a basic recipe for people who are trying to cut their cooking time down (like me) the bisquick coffee cake recipe is a sentimental classic. But that doesn't mean we aren't free to doctor it up. Before I made this coffee cake, I was considering making an apple cake or a chocolate chip coffee cake. I went with the cherries because I have these beautiful dried cherries in my fridge. And I added pecans and oatmeal to my topping because I often top my muffins with an oatmeal/nut crumble and really enjoy it. That's why I went  heavy on the topping this time.

Sadly, I made this two days ago, and it is already gone. :( I kind of wanted some for breakfast.

I suppose I should make some more. I could. Apparently, you can make the mix the night before, leave it in your fridge over night, and then bake it in the morning. That's good for those of us, like me, who take a while to wake up and be effective in the morning.

I'd love to know if anyone makes this and what kind of additions or substitutions they make to their coffee cake.

Monday, August 06, 2012

Harry Potter Party!


 I have been working on this party for quite some time, from searching pinterest for great ideas to making favors to hunting thrift stores and making decorations and taking trips to the 99 cent store oh and all the crafts.

So this weekend it finally happened. And it didn't rain until after the party, woo hoo!

I still have some crafts to post, so I'm going to show you some of the things I've already posted or things where I don't have tutorials, or just fun things.


 I brought my fancy wooden table out to the deck and laid a baroque looking runner across it so I could set up my potions table scape. I set out the gold cups and napkins and I had a few candle stands and candy bowls that I set with crystal platters. I liked the height they gave and thought they would work really well when I brought out the candy for Honeydukes Sweetshop and the Cauldron Cakes.  But somehow, the sweets never made it onto the pretty table.


 I took some of my son's toy snakes and wrapped them in and out of the bottle, for just a little bit of added spookiness.

And how about that fantastic green glass bowl I found at the thrift store? I filled it with the Expecto Patronum and Dementor Stones activity.


 Here we have a photobooth set up that I made. I took out the navy sheet and pillowcase and bought some glow in the dark stars from the dollar store, but for a while, I thought I'd run out of time and not be able to put it up... but at the last minute, I tacked the sheet up to an unused corner of the deck and covered the ottoman with the pillow case, brought out the little railroad village rug and stuck those stars on the sheet.


For the amount of effort it took, this photobooth was really worth it.  If I'd had a little more time, I would have made a witch broom to go with it.


When the kids first got here, I had them choose their favorite owlet from amongst Pigwidgeon's Pals.

That is Ivy's christmas gift, Mrs Hoot Hoot inside the old birdcage, on top of the old suitcase, ready to travel to Hogwarts.

Then they got to pick their wand from the box sent from Ollivander's Workshop.


I made gift bags and wrote their names on the gift bags so that they would be able to keep track of their owls and wands and other assorted stuff. That was a good plan, because with all the running around that happened later, they really needed one place to put their favors. Here is a tutorial for the gift bags .

 While waiting for all the kids to arrive, they got right to work at Transfiguration Class, where they needed to turn a rock into a creature.

All I did for this activity was to go to the 99 Cent store and buy some decorative rocks (in gray and green glass) some paint, glue, feathers, markers, gems, pipe cleaners and of course, googly eyes.

Then I just put those all in a box and put it on a kids table covered with a silver table cloth.  They really loved it. Who knew?


 I also made some Hogwarts House Banners. I really like how they came out, so I'll try to do a tutorial later on, but I really just painted them free hand.

I kept staring at them during the party and going, "wow, I like those." Right now, they are living very happily up above G's bed.

Once a bunch of kids were all there, I brought out some balloons and told them that they had to keep them in the air with their wands and the spell, "Wingardium Leviosa" I didn't get any pictures of that because I was going another craft at that point.


ACID POPS! You can see how I made these and displayed them here. They were a big hit with the kids and with the adults. But the kids were still sweaty after the acid pops so I remembered that I had some Gillywater in the fridge.

What is Gillywater? Oh, no one knows, but it was in the books, and I found this site where they wanted an alternate Harry Potter drink and found an Invisible Koolaid that tastes like Koolaid but looks like water. I put it in a clear glass jar and filled their glasses with the magical stuff.

The kids really liked the Gillywater and it was so easy, I almost forgot about it until I realized how thirsty the kids were after running around.

I forgot about quite a few things during this party. I forgot to put out the chocolate covered flies/raisins. I forgot to make that broom so the kids could fly. I forgot to do the crystal ball reading with the meditation jars I made. I also forgot to hang up the floating candles, and I'm kind of bummed about that one, because I really wanted to see how they turned out.


Then they went back out to play again, off in the yard. It was a Wizard War, with their wands and another craft I made out of recycled coffee can lids that I painted with silver stars, lightning bolts and swirls of various types. They would fling them like frisbees at each other and then run around picking them up again, with cries of, "I'm loaded! Better watch out!"


These are the spell discs I made. No tutorial. It's just painted directly on the plastic with silver craft paint. Frisbees would work very well for this and could also serve as favors for the kids to take home, but I had a dozen coffee can lids that I'd been holding onto (I use them for paint palettes sometimes) and when the brainstorm came that is what happened. I'd been thinking they would be used in a Wizard Duel where two kids stood apart and tried to throw it at/to the other kid, but the kids turned them into a wizard war and then ran their little butts off and got all sweaty.

I really tried to alternate slow paced, sit down activities with running around, because it would keep the kids from getting bored or worn out. So after Wizard War, I got out the Butter Beer. No photos of that, because I was too busy serving and by the time I was finished, everyone was pretty much done.


The next activity was the Expecto Patronum spell with the Dementor Stones.  That was a lot of fun and very cool when they were opening them... I mean, working on their spell. You can see how that worked here.

Once we finished the Expecto Patronum, I asked the kids what they wanted to do next and if they were ready for the candy.

Silly me.

They practically herded me into the kitchen to get the candy. I wisely didn't have it sitting out for most of the party, not only because some things would melt in the heat, but also because they would have been snitching candy the entire time.

As it was, they all wanted to be "helpful" when it came to the candy, and offered to carry the candy back out to the deck. Aww so sweet. I gave them the sugar mice and the chocolate frogs to take out.

But by the time I brought the main tray out, they'd set everything up on the little coffee table I'd put out there, kid height, instead of the pretty potions display table where I had all the nice cake stands and such.

Oh well. There was no orderly civilized Honeydukes Sweetshop line. No, it was mass, sweet, chaos. A free for all.


THEY LOVED IT.


Then I brought out the cauldron cakes but that was kind of anticlimactic after the candy. I thought they were great, but the kids were mostly sugared out.

And then they spent about an hour pulling each other around in a wagon. That wasn't part of my party planning. Perhaps in their imaginations, it was the flying Ford Anglia that Ron wrecked.

Anyway it was a lot of fun and some things were definitely more worth the fuss than others.

The wands were worth it.

The owlets, sadly, not quite as fun. Unless they took them home and loved them quietly. So not quite worth it.

The Acid Pops were great... for adults and kids. Worth it.

The chocolate frogs? They were cool, but the kids didn't love them that much and the adults didn't bother much with the candy. I would have made fewer chocolate frogs. Not so worth it. Better for an adult party.

Sugar Mice? Also cool, but I will probably eat more out of my fridge than all of the kids combined. So I'm glad there are left overs, because those are mine. But perhaps not worth it for the level of time consumed in making them. Also better for an adult party.

Honeydukes Sweetshop/table of candy. TOTALLY worth it. Maybe better to just get candy from the store instead of making some of it, though. Most of the home made candy was more trouble than it was worth.

The Gillywater/Invisible Koolaid? Cheap, easy and fast. Beloved by kids. Worth it.

The Butterbeer? Tasty, but very sweet, done soon, with no refills. I bought too much ice cream and cream soda. Maybe not worth the stress. Adult party. Spiked with real booze.

The Expecto Patronum/Dementor Stones activity. Really cool and worth it, though it took a while to craft.

Cupcakes? Worth it, because you need cake and these were tasty and not that hard, although a little stressful. But it could have been any cake really... so not necessary. Also, i had trouble with the heat and the melting of chocolate. Again possibly more for an adult, indoor party.

Those flying disc spells? I painted them months ago and just stuck them in a cupboard and the kids played a lot with them, so Worth It. Same for the balloons which are always fun.

Gift bags, easy and worth it. Really I had been planning some sort of difficult craft for making cauldrons and the bags worked fine.

The Pet Rocks/Transfiguration. awesome and low maintenance and just the cost of the dollar store items. Worth It.

And as for the banners and the potion bottles? I really liked the way they looked and I think they added to the Harry Potter feel, so worth it. And G gets to keep the banners.

Also, the photo booth was pretty easy, so that was worth it too. I've got pictures from it.

It seems that I got wrapped up in "cool projects" that would have been better for older party goers but were kind of lost on little kids who like koolaid, running around and candy. Hmm. Well, live and learn there, Ro.

Boy, I also have a lot to post on this party. If you click the links, you will find my tutorials and recipes to many of the crafts and foods, and you can decide for yourself which ones might be worth your time and effort.


Friday, August 03, 2012

Easy DIY Sweet Creamer and a Pretty Tea Cup

 Yum. Sweet Cream Creamer.

I'm taking a break from the Harry Potter extravaganza to make myself a cup of iced coffee with this super easy creamer.

So easy.

One can of evaporated skim milk.
One can of sweetened condensed milk.

Mix together.

Pour into coffee.

I had an open can of sweetened condensed milk from making my sugar mice and I needed to use it up and then I came across this recipe.  And I always have coffee to drink. Regular coffee is fine with sugar, but iced coffee needs something that is already dissolved for sweetness. We don't want grainy iced coffee, now do we? No we don't. So I tried the creamer recipe. Maybe some day I'll get around to doing that cold brewed coffee thing. I should hurry up before summer is over.

And yes that is a parmesan cheese container. Don't hate me. They are a good size and have that nice flip cap, so the sticky stuff doesn't get all gummed up in the threads of the screw cap.

Here's the iced coffee. For some reason it reminds me of  my grandmother. She made cafe con leche all the time, and it wasn't with canned milk, but something about it brings her back, so that's nice.

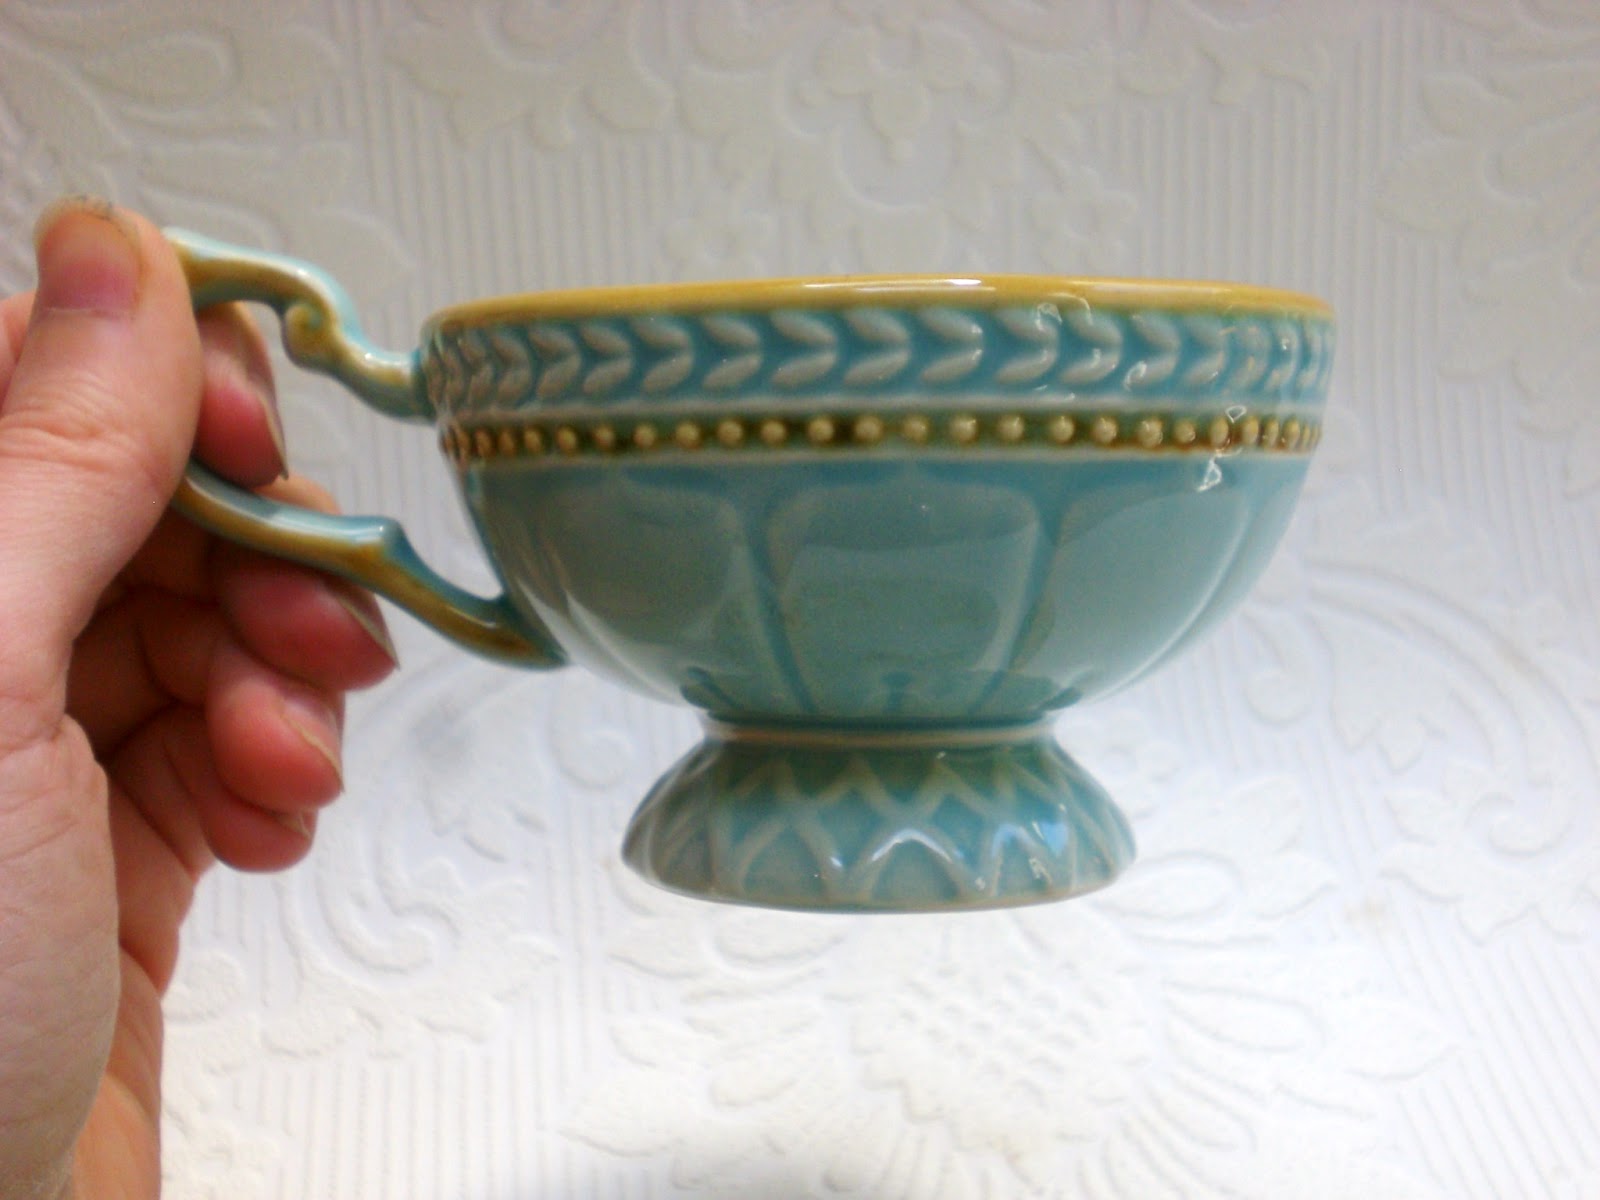
Also nice is this lovely majolica tea cup I found at a thrift store when I was out looking for bottles and other supplies for my Harry Potter party.

It is so pretty I couldn't resist. Love the color and the design. I used to collect tea cups before I had kids, so it's nice to find one that I like.


Oh, what a pretty pattern.
And a lovely cup.

That is all. Break over. I must go back to tending the Harry Potter party now. I hope to have many pictures come Monday.  I hope I have the time to take photos. Sometimes I run out of time and the kids are too all up in my bizness and won't let me have leisurely photo shoots.  Well. We'll see what happens.

Wednesday, July 25, 2012

Living This Season As It Is

Working with the kids on papier mache Harry Potter wands.

The summer time is in midswing.

The days are long, stretching into the night. The heat is sweltering. School is out and the kids are home and looking for trouble.

In my mind, I think of summer and a time of relaxation, vacation and the opportunity to really get into projects I want to do.

But the reality is that, as the mother of two still young children, there is no vacation for me in summer.  This is not my vacation, but theirs. I am back on duty as a nearly full time stay at home mom. However my job outside of the home isn't lightened during these times, in fact, this is the busy season for us so my hours are a little longer at that, too.

The problem arises here, when my reality does not live up to my expectations. Just like when you go to a movie, expecting it to be AWESOME and it is just "meh." If you had sat down in the theater without those grand expectations, you would have enjoyed the movie, called it "fun" and been pleasantly surprised. But because you believed it should be something more, something other than what it was, you get cranky, and dissatisfied.

So my summer is like a blockbuster movie that failed to live up to my expectations. I thought I would get back to writing, whip my house into shape, shape up that fabulous Harry Potter party for the boy, paint every day, build my etsy shop into a behemoth, keep my kids from the summer slide and create fabulous games and activities for them every day.

Really... there are still only 24 hours in the day, and there was no way my summer could live up to these grand expectations. Especially since with every goal that I did not meet, I got more and more disgruntled, pouty, even.

This is not the fault of my summer.  The summer is what it is. The kids are running wild and watching far too much tv. I am going to work 5 days a week and coming home 3-6 hours later. The pumpkin seeds we planted are a bust. The kids' reading program plans lost steam, slumping along like summer slide fashion. I have far less time to myself as I am waking up later, since the kids don't need to get to school early and the kids are staying up later with the sun, so that means writing is pretty much out. I can do some creative things while the kids are with me, but I can not get the focus together to really write intensely when the girl wants my attention every 5 minutes and I am refereeing sibling fights every other 5 minutes.

OK.

Well the point of all this is that in order to be productive and enjoy the life that we have, we must accept the season that we are living. This season is summer. It is not the summer of my childhood, with endless days stretching out unmarked (or it isn't for me, that's MY kids' summer.) Nor is it the summer of my teaching days, when my hard work during the year was punctuated by glorious days where I could write and paint and really get down to the work that I had to put aside during the work year.

No, this is the busy mom summer I have. To accept it as THIS summer, means I don't expect it to be the lazy summer of my childhood, or the painting/writing summer of my pre-child days. To accept it as THIS summer means I enjoy making crafts with my kids, or staying up late with them, watching favorite movies from my own child hood (that's right, ET, I'm talking to you). It means researching and experimenting with ideas that will create my son's dream Harry Potter party, even if I think I should go even farther and make it even fancier, even though I am not a professional party planner with unlimited resources and dedicated time. Accepting this summer as it is means letting myself be lazy sometimes, and not expecting constant productivity.

Perhaps it also means letting go of the disappointment that I am not in another season, where I can do each and everything on my dream to do list.

The dream to do list is not about reality, see? So why hold onto it? Why not just accept that this is my season, and the best I can do is to make it the best season it can be, to appreciate it for what it is.

What season are you in right now? Are you accepting it for what it is, or are you wishing for some other summer? Some other springtime or autumn?

Tuesday, July 17, 2012

Refashioned Skirt: Bleach Stripes DIY


Bleach striped skirt, 
refashioned from a stretchy old black pencil skirt 

I have been mulling over the creation of this skirt for quite some time, wondering how I could manage this. I've been researching ideas on pinterest and putting them on my do it yourself upcycled tshirt board. I know it says t-shirt and this is a skirt, but I play fast and loose like that with my board titles. It's really about upcycling old clothes. Which is what I did here. And again, I did it fast and loose. Hey, I guess it's my thing.


 First I picked my item to upcycle. I was originally thinking I could turn a striped tshirt into a skirt, but when I realized I already had a black skirt I rarely wore and was willing to sacrifice if it didn't turn out right, my decision was made. I took my skirt and found a flattened cardboard box that was approximately the same dimensions. Then I slid the skirt over the flattened box and straightened out all the wrinkles. I taped the stripes out on the skirt, using packing tape. I've heard painters tape and duct tape can also work, but I was worried about the duct tape pulling the fabric of the skirt, and I didn't have any painters tape.


I took my whole skirt/cardboard/tape contraption out onto the back deck, laid down some newspapers to keep the mess contained and took out the bleach. Warning: Also wear clothes that you do not mind ruining with bleach stains.  You can see my bleach mixture here, in the tupperware. It's about 50/50 bleach and water. I played it safe, since I've never done this with bleach before and I didn't want to ruin the fabric with a bleach that was too strong. I had a nice new paintbrush to use, and it worked perfectly for my purposes. And yes, I probably should have used gloves, but I barely touched any bleach and had no problem without gloves. I didn't even get any bleach on my clothes. This time, at least. Oh. P.S. I did this outside. Make sure you have good ventilation and your work area is covered/safe from bleach splashes. This projects has the potential to be tragically and permanently messy. Be careful. This is not a project for kids.


 So here I am beginning to paint on the bleach. I saturated the hem and moved onto the next stripe. You can see the bleach already beginning to work, lightening the bottom stripe to brown. Forgive the off kilter photos here, I had a bleach brush in one hand and a camera in the other and was starting to panic when I saw the color start to change so soon. I sped through the stripes, making sure to saturate the bleach through any wrinkles. I was okay with it if it didn't come out perfectly. My original plan here was to paint the stripes on without the tape, but I'm glad I used the tape. It kept me from panicking even more and gave me a guide, and kept the bleach off of the areas I wanted to keep black.


 After I finished bleaching the stripes on one side of the box, I flipped the box/skirt over. You can see at the sides that the bleach has already taken out a lot of the black dye.

 Here is the back side of the skirt after I bleached it.

At this point, my panic took over again. I wasn't sure how the bleach would react and was afraid of leaving it on too long and causing the fabric to burn away. I yanked the cardboard out of the skirt and pulled off the tape... luckily, it mostly came off all at once when the cardboard came out. I tossed the cardboard and the wad of tape to the side and ran to the kitchen sink to rinse out all the bleach.


Here she is rinsed and laid out on the porch for a photo. The stripes are irregular, but still stripey. The bleach bled under the tape, but not too much. In retrospect, I wonder if I should have put the bleach on when the skirt was already wet. I bleached the dry skirt. (update from Jill Plumley. DON'T wet the fabric first or the bleach will spread to all the wet areas. Thanks Jill.) Also in retrospect, I think I would have gone over the whole skirt with another layer of bleach. If you'll notice, the sides of the skirt where the front bleach and back bleach overlapped are a bit paler.

I also would not have been so conservative with my bleach. I might have used a stronger bleach solution and I would have left the bleach on longer for a lighter stripe. I suppose I was worried that the bleach would bleed all the way and remove all of the black. 

But in the end, I was satisfied with my experiment, even if it isn't a white/black skirt and it didn't quite turn out how I expected. I think I will wear this skirt a lot more now than I did when it was pure black.

Here is the back side of the skirt. This was an accidental photo. It turns out, it's kind of hard to photograph your own outfit. The first photo was actually taken by my 5 year old daughter after a tiny bit of tutoring. It's not so bad. Yay, Ivy.  She actually enjoyed taking my fashion photo so much that she said, "take a picture of me!" and did a whole photo shoot. Actually, she might like being in front of the camera better than being behind the camera. 
Here she is, the supermodel. I would like you to note, that she styled her own outfit and the skirt she is wearing is her favorite skirt, which is an upcycled skirt I made her, posted here. 

I'm wondering if any of you have any experience working with bleach. Do you have any hints or tips?

Friday, July 13, 2012

Caccio e Pepe with Bucatina (Pasta with cheese and pepper)

Caccio e Pepe with Bucatini


I have recently learned to love this simple and basic pasta recipe.

Apparently it's an Italian classic, but I never knew about it until I read it on some blog.... I don't even remember which one, since it was a while ago, and I've done a little research since on how different people make theirs.

The other day, in the heart of the heat wave, I had a hankering for it, so I suffered through the boiling water and had it served with a few slices of left over cold grilled steak.

It's pretty simple. The original recipe is nothing put pasta, fresh ground pepper, grated grana padano (a type of parmesan) cheese and pasta water, but being me, I fudge a little and figure out how I can make the meal my own. I really enjoyed the addition of the bucatini, which is a delightful long tube shaped pasta that has some heft.

1 lb Pasta (some type of long thin pasta is best)
1 or 2 cloves of garlic, minced
1/4-1/2 cup grated parmesan and/or romano cheese  (I used half parm and half romano)
Freshly ground pepper to taste (do not be afraid of the pepper)
Reserved water from cooking the pasta.

Make the pasta according to the directions on the package. Do not forget to salt the water.

Sautee a couple cloves of diced garlic in olive oil in a large pan. When the pasta is done, strain and reserve the cooking liquid. Add the pasta to the garlic and olive oil.  Add your grated cheese to your pasta and fresh ground pepper to taste. Don't be afraid of the pepper.  Mix it up a bit.  It's a little sticky at this point and perhaps not quite melted. Add some of your pasta water a few ounces at a time, and stir your pasta so the rest of the cheese melts. The cheese and starchy pasta water should blend together to make a creamy sauce.  And there you go, your pasta is done. Yum.

As with all simple foods, this dish will be best with fresh ingredients. Fresh ground pepper. Fresh grated cheese. But I must confess, I have made it with parmesan from a jar and a pre-ground pepper (shhh. don't tell anyone,) and I have still devoured it and licked out the bowl. Well, maybe not literally. I add the garlic and olive oil because I like garlic and olive oil, but you don't need them for this dish. And also, these ingredients are so simple that you are free to adjust measurements purely to your liking. More or less peppery. More or less cheesy. Drier or creamier. Garlic or no garlic. It's up to you.

S thought I should add mushrooms or sausage or cream, and I told him no. The delight of this dish is the simplicity. Sometimes, that's all you want.

Friday, June 29, 2012

Rich Iced Coffee Treat and Mocha Syrup

This is one of my favorite summer afternoon treats.

It's simple to make, and delicious, and turns a regular day into a celebration.

Take some cold coffee. I make a little extra in the morning and save it for later. Make sure you take it off the burner so that it doesn't get burned. Burned coffee is not a treat. Or you can make one of those fancy cold brewed coffees that I never get around to, because I always have leftover coffee in my coffee maker. (Actually, after reading that tutorial, I really want to try it. I know where to get gallon glass jars.)

Pour your coffee into a glass and add milk or cream to your desired lightness. Or leave it black if that is your taste.

Add ice.

Add a scoop of vanilla ice cream. Coffee ice cream also works. As does chocolate. Truth is, the pictured coffee has butter pecan ice cream, because that is what I had in the freezer.

Pour on some lovely chocolate syrup. Here is where you want to be careful. I find that regular hersheys syrup is not that good, but dark chocolate hersheys is works well. I also don't like mine too chocolatey so I add just enough for a slight sweetness, but if you wanted yours more mocha, add more chocolate.

I did not use store bought chocolate syrup here. I made my own, because I have been feeling disappointed with store bought varieties. It was very easy and is very delicious. And I added coffee too my syrup because I wanted it to be a bit darker. Here is my chocolate syrup recipe, which is technically, probably a mocha syrup.

Mocha Syrup
1/2 cup water
1/2 cup strong coffee
1 cup white sugar
3/4 cup cocoa powder
1 tsp vanilla
pinch sea salt

In a heavy sauce pan, heat water, coffee and sugar together over medium heat, stirring frequently, until sugar is dissolved. Simmer for a few minutes. Add cocoa powder a bit at a time, whisking into the sugar syrup until incorporated. Add vanilla and sea salt. Simmer for a few minutes more.

Let cool and pour into a glass jar for storage in the refrigerator.

According to my children, who got to taste the syrup before bed, "Mommy! I will DIE if I don't get more chocolate syrup!" It's that good. Or they're that dramatic. Not sure which.

This is a syrup and does not get thick in the refrigerator, so is always ready to pour onto ice cream or into milk or iced coffee. It is not a chocolate or hot fudge sauce, but thin like a syrup. I think this recipe could stand cutting out the water entirely and making it all coffee. I can't actually taste the coffee in the syrup, as it compliments the stronger chocolate flavor and just gives it a richer taste, rather than a mocha taste. A cup of espresso might make it a powerful mocha flavor. If anyone tries that, I'd love to hear how it works out.

Anyway, enjoy your Friday. Have a chocolate creamy treat for me.

Thursday, June 14, 2012

Salted Caramel Sauce Delight

Oh yummy.

Yesterday I was taken with the urge to try to make a salted caramel sauce. Luckily I came across this on pinterest.

I've never made caramel sauce before, so I pretty much followed the recipe exactly... well, except I cut it in half, since this was an experiment and I didn't know if it would work out. Oh yeah, and I didn't have heavy cream so I used half and half. And my butter was salted, so I cut back on the sea salt.

Oh all right.... I'll tell you what I did. I'll also tell you what I learned after I went and consulted my friendly neighborhood pastry chef, Susan.

1 cup white sugar.
6 TBS salted butter
1/2 cup half and half.
about a teaspoon of sea salt (not fancy flaky sea salt)

I covered the bottom of a heavy, large pot with the sugar and heated over medium high heat, stirring pretty much continuously. It took a long time. At first I thought I was doing something wrong, because it wasn't clumping up like the recipe said, it was just getting to be hot sugar. But as Susan pointed out to me, it takes a while for sugar to get up to 300 degrees. Interesting she kept saying 300 degrees, because the original recipe said 350.

So soon it clumped up and I stirred it with a whisk like the recipe said until all the sugar was melted. And then I stopped stirring because the stirring will make it seize up. I swirled the pot a bit until it got to the right color. I didn't use a thermometer, because I didn't have one, and I thought I"d seen sugar being cooked enough to be able to judge the correct color change.

Then when it got to a nice caramelly color, I put in the butter all at the same time. Good thing the original recipe warned that it will boil up quite a bit (which is why you need a bigger pot than you'd assume) It really boiled up. Susan says that's because it's 300 degrees and it will bring the butter up to that temperature, but then it settles down and I stirred it until the butter was melted completely and then I turned off the heat.

That's when I added the half and half, and I think I should have done it even more slowly, because it REALLY boiled up and I almost burned myself. So be careful. Whisk again until the cream is incorporated and add the sea salt and whisk until smooth. Let cool 10-15 minutes and put in a glass jar.

I must say that I didn't wait 15 minutes. I HAD to taste test it.

My caramel sauce is quite salty. And the caramel has a very slight bitterness to it, because I think I cooked it just a tiny bit too long. Susan told me it was because the caramel kept cooking after the butter and cream was added, so that counted for the darker taste than I wanted. I thought I was so clever to "know" the right color for the caramel, and then I got confounded by the rest of the cooking process. Oh well, live and learn.

I also told Susan that I thought my caramel sauce was a tiny bit too grainy, and she said that it was okay, and that I could just heat it up and stir it and it would get smooth again. Have I mentioned how much I love having a pastry chef at my disposal? Pastry chefs have sweet brains for picking. Susan also told me to use better butter and that I would be surprised by how good butter would affect my baking.

However, the toasty flavor and excess salt in my caramel sauce did not stop me from enjoying it by the spoonful and giving myself a stomach ache.

Sadly, I did not have the brainstorm of dipping sliced apples into the salted caramel sauce until I already had the stomach ache. Because when combined with the sweetness of the apple, all the saltiness of the caramel sauce is offset and instead it is just an explosion of flavor.

Oh my god. So good.

I recommend anyone try it. It wasn't hard, although getting it to the right temperature/color is a little intimidating. If you want to try it, I also recommend that you go to the original recipe link, because not only is it more complete than mine, but she also has pictures. I was too frightened of burning sugar to take pictures, plus my light sucked.

All in all, I enjoyed this experiment and am looking forward to all the delightful treats I will be able to grace with a salted caramel sauce.


Thursday, June 07, 2012

Hooray for Summer!

 Hooray for Summer!

We're getting really excited over here for summer. Hoping for long days and green shadows, sprinklers and popsicles, projects and adventures.

Tomorrow is the last day of school and the kick off for the library reading program, with games and crafts and prizes and lots of fun down town. I think that's why I whipped together this little package of joy.

It's a book (vintage, which I was planning on using for a craft project) wrapped in brown paper, which I love and can't help wrapping everything in as I sing Favorite Things. Then I decorated it with some little flags I made and the "hooray!" banner. Those are little illustrations that I already posted about, so I'm kind of pleased that I figured out something to do with them.

That's what summer feels like to me. A wrapped present, a celebration, a mystery, and the possibility of adventure... because to me, a book is always an adventure. I guess you know what kind of gal I am.
We've already started on the summer preparations, since the girl has been out of school for a while. This is her lilac bush tent/fort/hideout. 

 She's giving the thumbs up.
And this was the beginning of a play, put on with a neighbor, who is the one who had the brilliant idea to dress up in costumes. Somehow costumes always make things seem to be more of an event.

As for me, I'm getting together a summer bucket list of activities and adventures to go on. I've been spending some time on planning the kids portion of the summer, because the end of school is so near, but underneath that is my personal bucket list, pushing at the mom.

I've got some things I need to do. And I've got to figure out a way to get those things done when I've got two rambunctious kids around all day and a part time job as well.

What have you done to fit your passions into a full life with work and kids? Any tips on incorporating summer break into your personal work?

Friday, June 01, 2012

Mango Mint White Sangria, (and how to cube a mango)

Oh it's a gray and chilly Friday morning where I am, and I have to go to work in an hour and a half, and I am seriously not in the mood for a kick-back and relax, have a drink kind of post, but I think I'm going to write one, anyway.

This Memorial Day, it was a beautiful sunny day, quite hot, and the kids were having a play date down the street, and I was in the mood for a nice drink... but I couldn't find where S had hidden the limes for my margarita and he was out and didn't get back to me before I decided to take matters into my own hands and invent a cooling summer drink on the spot.

I opened up the fridge to see what I could find. There was half a bottle of white wine, a little too sweet for my tastes, some fruit that needed to be used up asap, a handful of mint from my potted herb garden and of course, some of my homemade orange liqueur. I only had enough to make one or two glasses, enough for me, but let's see if I can adjust the recipe for a larger portion.

Mango Mint White Sangria

One ripe mango, cut into one inch cubes
One orange, cut into one inch cubes
6 strawberries, cut into one inch pieces
One bottle white wine of choice
One cup mango nectar
1/2 cup orange liqueur (triple sec, cointreau, grand marnier, or homemade)
6 or so sprigs fresh mint, torn into small pieces
Ice
Splash sprite or seltzer (optional)
Fruit for garnish (optional)

Cut fruit and put in a wide mouth jar or pitcher. Toss in mint. Pour in mango nectar, wine and liqueur. Stir. Pour in a glass over ice and add a splash of sprite or seltzer to taste. Garnish with fruit.  Voila.

In the interest of full disclosure, I got my mango nectar when the first mango I tried to cut up ended up being too soft to cut, so I squeezed it into the pitcher instead. It turned out to be quite a bit of nectar. I'm sure store bought nectar would be just as good. Or, almost anyway. You could substitute the mango/mango nectar for peach and peach nectar... in fact, I substituted mango for peaches, since all the recipes I found online were for white sangria with peaches, and I didn't have any peaches.

I was a little worried that it would be too sweet, what with the sweet white wine, but perhaps because my liqueur was less sweet than store bought, it turned out fine. If it had been too sweet, I'd have added some lime juice to add a bite. But then, if I'd known where the limes were, I would have been drinking a margarita.

There's one more thing I'd like to share about this, the part that is actually the trickiest in making this drink.

How to cut a mango into cubes
Despite the terrible picture, I'm going to do my best to explain this.

Okay, take a ripe mango. First you have to understand the mango. The pit inside is large and almond shaped  and flat, and you want to cut around the pit to get the largest portion of the flesh. To do this you cut the mango into three pieces. The center piece with the pit, and two side pieces that will be rather boat shaped and full of mango flesh.

Hold the mango with the stem end pointing up and look for the widest diameter of the mango. That is where the pit will be. Slice down from the stem end, starting a little bit in front of the stem. If you meet some resistance (the seed) angle your knife out a tiny bit to cut around it and then slice all the way through. Do this on both sides of the stem and you will have your two mango boats.

For each mango boat, slice a grid into the flesh, without cutting all the way through the skin. Take your grid marked boat and using your fingers, turn the boat inside out. The flesh will pop up in cubes, which you then can easily slice off of the skin and put into your sangria.

You are now left with the pit, which is ringed with mango flesh and skin. You could peel the skin and cute the flesh off the pit, chopping it up and putting it into you drink, but I always just peel the skin and the eat it all, right off the pit. Yum yum.

I am not sure if this explanation of mango cutting is clear enough, so if you need a visual tutorial, leave a comment and I will go back in and add pictures. I was taught by a Caribbean friend. Once you learn it, it makes mangoes much easier to eat and cook with. Well much less messy anyway.

I hope you take the opportunity this weekend to enjoy yourself and relax, try something tasty. Add a new flavor and see how it works for you.


Thursday, May 31, 2012

June Dots and Teapots

Tea Party

This is a project I am working on, a request for rosebud teacups.

I am learning a little bit about who I am as an artist and illustrator.

First of all, I like things loose and fast. And a little bit pretty, but with a rough edge. Kind of like a punk chick. I'm a little bit Debbie Harry.

How does this connect with making illustrations of rosebud teacups?

I guess that's why I was thinking about it. I think it's a good thing to try new things that you might not otherwise have tried. The truth is that the whole world does not see things the way I do, and that's fine, but sometimes if my view point and the world's viewpoint can coincide, perhaps we can learn something or develop a bit in ways that might not have happened before. Perhaps the collision of different mindsets can make something that is remarkable in some way, attractive in ways neither I nor the world might have thought of before.

Well, when thinking about teacups, I was wondering how I should make it happen, how to do it so that it still felt like ME, so that I could still draw on my strengths, so that it could still feel like me.

And that's why I went with a loose sketch and a fast watercolor, but with pretty colors and delicate curves.

Okay, so it's not really a punk teapot, but it is, after all a request, and I am doing it for someone else.


June Dots

I also created my own pattern to go with this mismatched tea set. Yes, it's green and white polka dots, almost swiss dots, but I wanted the natural variation and imprecision that comes from off the cuff, eyeballing, not a ruler in sight painting. Okay, perhaps it's more whimsical than punk, but maybe it's just the intersection of the different urges in myself.

I really like these little polka dots. They are different shapes and shades and not really even at all. To me, they are like a June day in the sun, with the breeze blowing and the kids running around in the lawn and the bugs crawling around, and a paintbrush in my hand and a drink in my other hand while sitting on the porch.

Okay, so my day isn't punk either. Apparently watercolor tea parties in pink and green are just simply not punk. And it's probably true that I am not Debbie Harry. Probably.

But that's okay, because I'm Rowena. And that's good enough. Dots, teapots and all.
Related Posts Plugin for WordPress, Blogger...