Monday, July 16, 2012

Brown Paper Packages Minus the String

I have a love affair with brown kraft paper.

I do not know why I love it so much. I think because it is plentiful and cheap, if not free. You can buy a roll, but you can also collect brown paper bags and cut them up to use. It is sturdy. It has a pleasing neutral color. It is not showy or flashy, but fades into the background so that whatever you do to it takes center stage.

I haven't bought wrapping paper in ages and ages. I have been using brown paper to wrap presents since the 90s, at least. This is a maturation from my childhood tendency to wrap presents in the Sunday funny pages.

I also can't help singing "brown paper packages tied up with string, these are a few of my favorite things..." whenever I wrap presents in brown paper. And then of course I think of Julie Andrews and my childhood and good, positive things and the Alps.

Okay, I have to admit, I have purchased colored tissue paper. I happen to love that, too. There's so much that can be done with tissue paper. Wrapping, cut outs, paper flowers. It also acts as padding for delicate packages, and it comes in so many lovely colors.

In this package, which is wrapping for a purchase from my etsy store, I combined my two paper loves, brown paper and colored tissue.

First of all, it needed to be padded with something, and my
pretty green tissue fit the bill. And then, of course, I wanted to pretty it up. I could have done something with string and cut out charms or I could have wrapped it up with the brown paper and then added the string and charm.


Like this package. Brown paper package wrapped up with string. Okay, this isn't string, it's a fabric strip that I cut out and frayed, because, well, I like upcycling and reusing, I like handmade, and I like a rough, rustic element. It's a handmade ribbon! Also seen in the felt and gold upholstery remnant charm, with the visible hand stitching.

Any way, back to the first package, I liked the green. I liked the brown paper and I wanted to show both... but how? I went through my supplies and noticed I had a tiny heart shaped punch and voila, the collision of ideas created a brainstorm.

I folded the brown paper to the size of the tissue package, leaving a slim strip of green tissue showing, and then I punched the folded part of the paper with the heart punch, on both sides of the strip. That's it, just twice, because I was going for simple here. Then I taped the brown paper down, on the back, so you can't see it and so that the folded edges pop up a little to add a bit of dimension. This is a little delicate, this package, because the tape could come up easily, but it is non fussy and non frou frou. No ribbons or bows. I like it. And was pleased with how it came out. A little bit of experimentation. A little bit of looking at old supplies in new ways and here is a new way to package.

Yay.

Friday, July 13, 2012

Caccio e Pepe with Bucatina (Pasta with cheese and pepper)

Caccio e Pepe with Bucatini


I have recently learned to love this simple and basic pasta recipe.

Apparently it's an Italian classic, but I never knew about it until I read it on some blog.... I don't even remember which one, since it was a while ago, and I've done a little research since on how different people make theirs.

The other day, in the heart of the heat wave, I had a hankering for it, so I suffered through the boiling water and had it served with a few slices of left over cold grilled steak.

It's pretty simple. The original recipe is nothing put pasta, fresh ground pepper, grated grana padano (a type of parmesan) cheese and pasta water, but being me, I fudge a little and figure out how I can make the meal my own. I really enjoyed the addition of the bucatini, which is a delightful long tube shaped pasta that has some heft.

1 lb Pasta (some type of long thin pasta is best)
1 or 2 cloves of garlic, minced
1/4-1/2 cup grated parmesan and/or romano cheese  (I used half parm and half romano)
Freshly ground pepper to taste (do not be afraid of the pepper)
Reserved water from cooking the pasta.

Make the pasta according to the directions on the package. Do not forget to salt the water.

Sautee a couple cloves of diced garlic in olive oil in a large pan. When the pasta is done, strain and reserve the cooking liquid. Add the pasta to the garlic and olive oil.  Add your grated cheese to your pasta and fresh ground pepper to taste. Don't be afraid of the pepper.  Mix it up a bit.  It's a little sticky at this point and perhaps not quite melted. Add some of your pasta water a few ounces at a time, and stir your pasta so the rest of the cheese melts. The cheese and starchy pasta water should blend together to make a creamy sauce.  And there you go, your pasta is done. Yum.

As with all simple foods, this dish will be best with fresh ingredients. Fresh ground pepper. Fresh grated cheese. But I must confess, I have made it with parmesan from a jar and a pre-ground pepper (shhh. don't tell anyone,) and I have still devoured it and licked out the bowl. Well, maybe not literally. I add the garlic and olive oil because I like garlic and olive oil, but you don't need them for this dish. And also, these ingredients are so simple that you are free to adjust measurements purely to your liking. More or less peppery. More or less cheesy. Drier or creamier. Garlic or no garlic. It's up to you.

S thought I should add mushrooms or sausage or cream, and I told him no. The delight of this dish is the simplicity. Sometimes, that's all you want.

Thursday, July 12, 2012

Choose Happy

Choose Happy

Happiness is a choice.

It's odd to think that. It's not a destination you reach. It's not a thing you can buy. It's not something other people give you. It is a choice.

You choose to be happy. You choose to release the things that bring you down. You choose to focus on those lovely things that fill you with joy. You choose not to criticize. You choose to accept yourself. You choose to accept your life as it is.

But how can you choose to accept a life that is a struggle, a life that "doesn't make you happy?"

I don't think that accepting your life for what it is means you are giving in to the struggles. Rather, it's the reverse. When you accept that your life is your life is your own, you gain freedom from what holds you down.

It seems paradoxical, but it's true. When you stop resisting your life and start accepting it, you gain power. Your attention slides from what is wrong, what shouldn't be, what is frustrating you, to what is working, what can be improved, what is beautiful.

Does the negative go away? Well, the situations might go not go away, but your perception of them changes. And as your perception changes what once made you frustrated and unhappy releases its hold on you.

Honestly, this is something I am working on. It is the simplest thing in the world, but it is very hard. And I am not there yet. Accept the life I have. Let go of the resistance. Move forward in joy.

Choose happy

How do you "choose happy" in your life?

Tuesday, July 10, 2012

Trust the Process, even if it doesn't look like much

Trust the Process

I made this.

I made the whole thing. 

Sure I drew it, but I made it. I mean I made the paper. I used an egg carton to make paper mache pulp and I had a little left over, so I thought I'd try to make paper out of it.

It kind of looks like an egg carton. Which is not very impressive. Not at all like that handmade paper kind of look.

But that's why I drew the mandala and wrote the words "trust the process" on it.

I think I have a hard time trusting the process... accepting the season of life...not holding on to my idea of what things SHOULD be like.

I think this is a common problem.

Even as I was posting this I thought, I don't want to post it. It isn't finished or attractive or any of that. Not that it was meant to be. It was an experiment, it was a reminder of what it takes to develop things. It was about growth and experience, rather than results.

That's what process is about. And life itself is a process. It's about the living and not about the results. And if we trust that things will come out well if we put in our best efforts (even if maybe they're not so great in the egg carton, I mean moment) then the whole process automatically becomes richer and more enjoyable.

Trust life. Trust yourself. Trust the process. 

Monday, July 09, 2012

Refashioned T-Shirt with Faux Braided Neckline

Refashioned boxy boys t shirt with a faux braided neckline.

I have been collecting t-shirts lately. I love the fabric. It's so soft and low maintenance. It's comfortable. It comes in so many colors and is so ubiquitous. I liked to think about what I can make with old t-shirts. When I go to thrift stores, I always look for t-shirts I like. Sometimes, I just want the fabric for crafts and such, but sometimes, I want the shirt.

I like stripes. Perhaps a little too much. So when I found this boys tshirt at a thrift store, tight on the neck and sleeves, I decided I had to have it, even if I wasn't a boy. 

I sat with it for quite some time before I did anything. I knew I was going to cut off the sleeves and the neck, so I did that, then I sat with it for a bit longer. It is mighty square at this point. I tried it on though, and it was so comfortable that I decided I didn't want to put in darts or anything that would make it skinnier. But how was I going to refashion it to make it a bit more girly?

That's when I found a tutorial on pinterest (where I collect refashioning and upcycling of tshirts hints) and decided, well.... that's what I'm doing. This is a braided top tutorial. It makes a faux braid around the neckline without much sewing at all. Really, it's not a braid, which is made of separate strands wound together. It's more like crocheting, or weaving or twisting. 

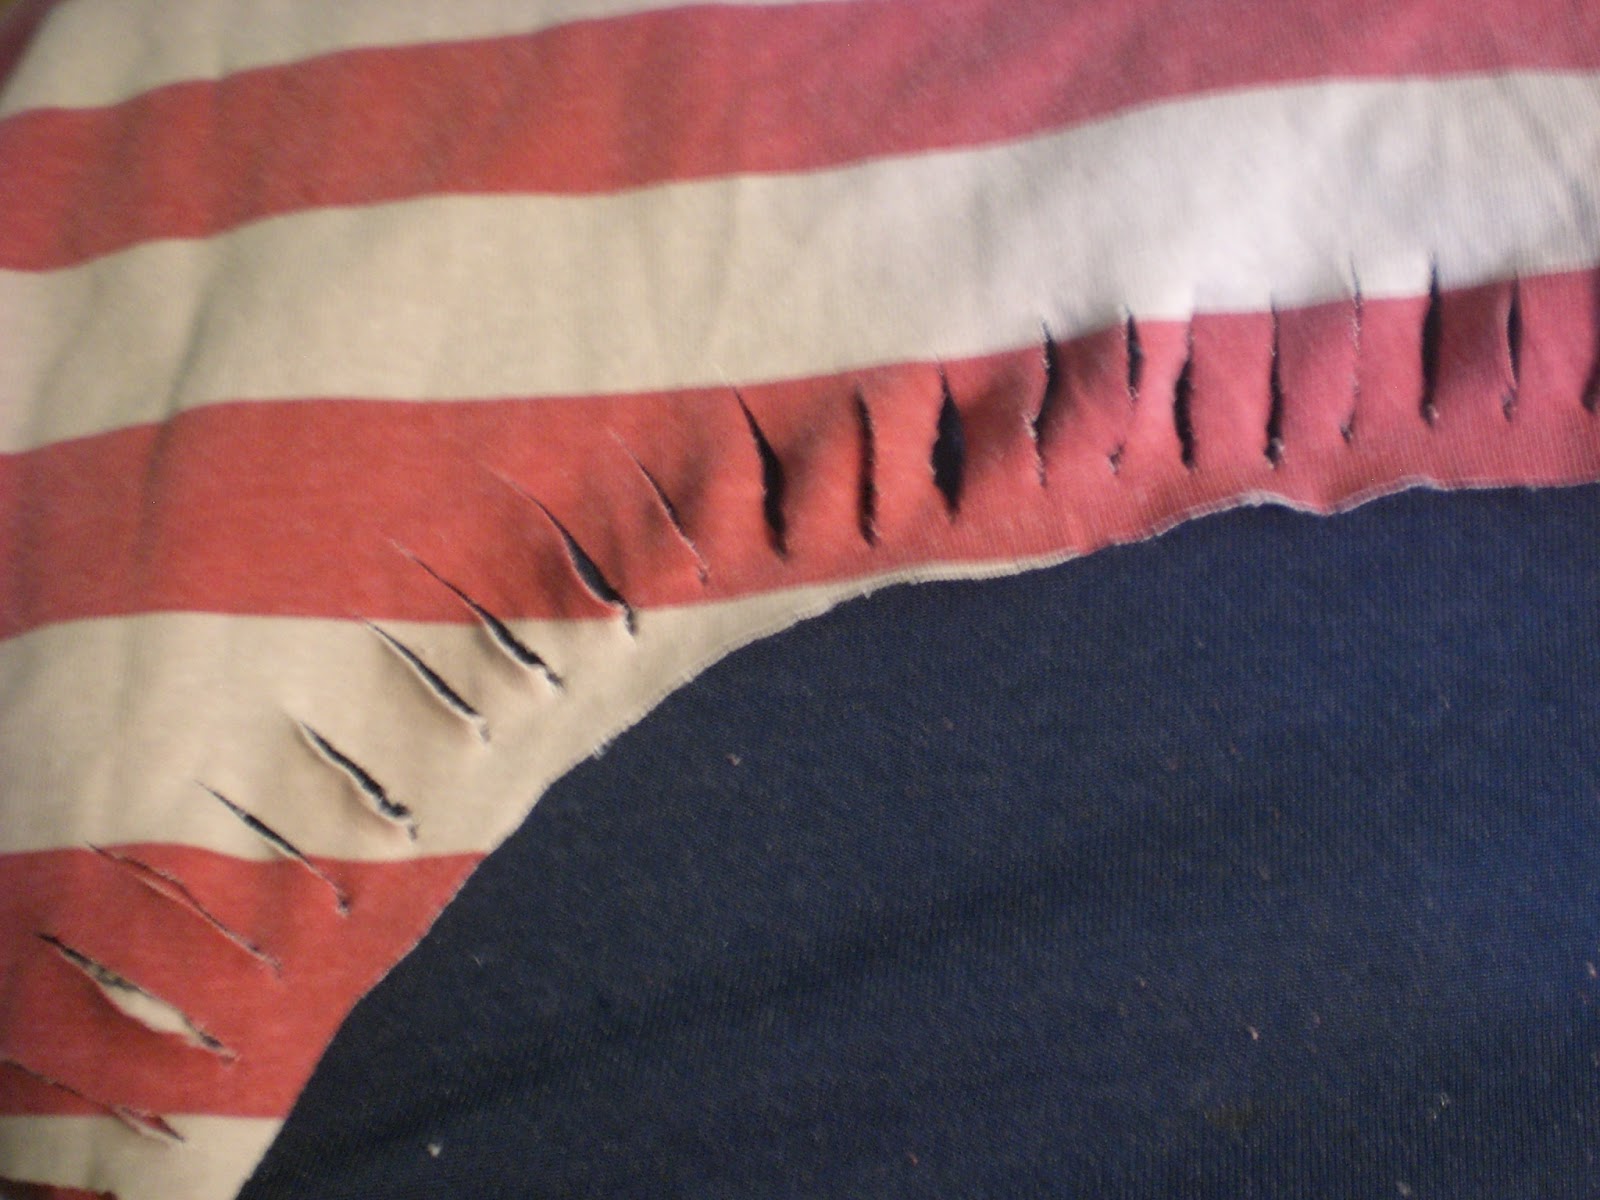
First, you cut 1" slits all the way around the top, making sure that your initial slit is very small, just big enough to pull the strip through (or you'll have to stitch up the extra hole that is left).  My first attempt made the slits around an inch apart...but when I wove them together, it was bunched up far too tight and the neck was itty bitty. So I unwove it and cut more slits in between the original slits. These are about 1/2 inch apart. pretty thin. The original tutorial has 2 inch long slits about 1 inch apart... so I suppose it's the proportion that is important. And you'll notice that there is no seam in the neckline any more, so I wanted to leave enough room in the fabric so it wouldn't tear. In the end, the 1/2 inch I left was plenty. It kind of flipped over behind the braid and became invisible.


The original tutorial has her finger weaving the strips together, sliding each strip of tshirt through the hole above it...but i realized immediately that a crochet hook would make it much easier. So that's what I did, using the hook and then hooking each following strip through the last one, bringing it over and looping another strip through, all the way around the collar to the original starting point. It would be possible to just weave the front of the neckline, but, my shirt was boxy enough that I had extra fabric enough to go all the way around. I did take my scissors to the back of the shirt and cut the neckline lower... and with a slightly squared off curve. In retrospect, I might have cut it even lower... and I think a v-neck might have been nice, too. It can really be any shape, the braid look is just embellishment to the neckline, although it does add a bit of "pleating" of fabric.


 When I got to the end of the braid, I used a bobby pin to hold it together so I could try it on. Just one little bobby pin. Then, when it turned out nicely, I took a piece of thread and a needle and stitched that last, loose loop onto the very first loop, sewing it down nice and tight. And that's it.

I did do some modifications afterwards. The sleeves ended up being kind of ruffled next to the braid, so I took my scissors and cut off some of the extra fabric, which made the ruffles less noticeable. I think that you could actually work with the ruffling effect to change the shape of the tshirt... maybe making a double row at the shoulder... one for the neck line and one for the shoulder line, and so creating a little bit of interest there. I also thought about adding another row of braiding to the front neckline, but since it was such a short shirt to begin with, I was worried about pulling the fabric up any more. Another interesting modification might be to take a few stitches to the body and make it a bit more narrow under the bust area... but then I'd be worried about interfering with the comfortable ease. Oh, I think I'll leave it comfy just the way it is.

Here I am relaxing in the air conditioning during the record breaking heat wave, in my comfortable refashioned shirt. I'm also trying out a scarf/hairdo that I found here. Yes. It was the Fourth of July, and no, it was not a coincidence that I was wearing a blue scarf and red and whitish striped shirt. Our celebration was quiet and involved chocolate pie, but I was dressed for it.

Friday, July 06, 2012

Too Hot to Cook Oreo Pudding Pie


Oreo Chocolate Pudding Pie

This Fourth of July, it was too hot to do anything but sit inside, the air conditioning blowing, and watch movie marathons. Ok, I went online for a little while. Shh. Don't tell anyone. 

Whatever is one supposed to do when one wants to have a sweet treat to go with one's grilled steak and corn feast?  One certainly isn't about to turn on the stove, let alone the oven. So one searches the internet to find no cook desserts and then goes to one's pantry to figure out what one has in stock.

Or that's what I did, anyway.

What I finally came up with was this no cook Oreo triple layer pie. Oreos. Instant pudding. Milk. Heavy Cream for whipping. I didn't follow the recipe exactly, I almost never do... but I did notice just now that I put too many cookies into the crust. Whoops. Almost the whole package.  Perhaps that's why the crust crumbled when I took it out of the pan. And I used unsweetened whipped cream instead of koolwhip, which, while it is more labor intensive, I think is actually an improvement on the recipe. It avoids the chemical taste of koolwhip and cuts the sweetness. I didn't add the cookie pieces to the whipped cream, either, because I like the smoothness without the crunch. I also think non instant pudding would be better but I didn't have any, and I wasn't about to turn on the stove to make pudding, either. 
24 oreos (plus more for garnish) food processed into crumbs
1/4 cup butter, melted
2 packages instant chocolate pudding mix
2 1/2 cups milk
1 half pint heavy cream, whipped

Mix oreo crumbs with melted butter and press into bottom and sides of  9" pie pan. Mix pudding according to pie instructions on the box (you know, pour milk into pudding mix and stir until combined.) Spoon half pudding mix into the pie plate and spread out evenly. Add half of the whipped cream to the remaining pudding mix and mix together. Add to pie plate and spread out evenly. Add remaining whipped cream to the top of the pie and spread out evenly. Sprinkle with cookie crumb garnish. Put in the refrigerator to chill/set. (The recipe says four hours, but with the instant pudding, it was definitely ready by the time dinner was finished, about 2 hours.)

If you want, garnish pie with mocha syrup. That was my daughter's idea, and it was really good. This pie is not nearly sweet as you'd expect it to be and is pretty light, although do not imagine that means you can eat another piece and not get a stomach ache. At least that's what happened to me.

Ok, well this isn't one of my recipes and it's a pretty well known one, I guess, but I've never made it, and it was easy, and I do really like the sub of fresh whipped cream. It satisfied my needs and hit the spot, so I'm posting it.

Tuesday, July 03, 2012

Call Me Ollivander (it's wizards and witches wand workshop over here


This morning I was moaning to myself, "oh I have nothing to post and I don't have time to paint anything whatever shall I do oh woe is me." (yes that is my internal voice, more or less) and then I got up to work on one of my projects for my sons up coming Harry Potter party, all the while moaning (woe is me).

And then I gave myself a metaphoric smack in the head.

Duh.

Work In Progress post. I've been developing my HP wands. I started with this tutorial, which is the one I used this Christmas, but my hot glue gun has since bit the dust, and rather than going out and buying a new one, I'm figuring out how to decorate and personalize each one using white glue, scraps and whatever else crafty thing I can come up with. So far I've used yarn soaked in glue (silver wand) tissue paper torn into long strips, saturated with glue and twisted (dark brown and orange wands), kraft paper wrapped around and around with glue plus embellishments (light brown wand and one black wand), and a paper mache pulp and glue. The paper mache pulp was from this tutorial. I kind of like it. I didn't make as much as she did since it's just a trial, but it's fun. It makes sense to use paper mache to me, since these are really paper mache wands.

I have to make, like, twenty of these.

This is what I have so far, with six of them embellished and painted with an undercoat, and two just the blank paper tubes. I figure when I make my next batch, I will do some photo tutorials to go along with it, because although I'm using the basic tutorial from instructables, I've also come up with my own solutions that I haven't seen anywhere. I'm also enjoying scrolling through dadcando and seeing what other people have done with this papermache wand tutorial. In fact, I just got an idea of what I can do with one of those blank paper tubes I have left.

It seems like all in all, it's a great basic blank from which we can use our own creativity to make something that works for us. I kind of like that all my wands are made with different materials, because the real wands in Harry Potter's world are all very different and have unique flavors and feels to them.

Well, that's just a sneak peek at what I've been up to. Now I've got to go off and do less creative projects. Oh who am I kidding, I'm going to embellish another wand.

Just remember, there is so much inspiration out there on the internet these days, but that doesn't mean that you have to follow exactly what they say. Use the ideas out there to inspire your own creativity.

Monday, July 02, 2012

Rose Tinted Girl and some thoughts about Leonor Fini

Rose Tinted Girl
3"x4" acrylic on paper

I did another mini portrait, playing with the underpaintings and bright colors. This is orange, green and pink.

I saw a painting of Leonor Fini's Splendid Devils a few weeks ago, and I guess something about it stuck in my mind. The hair, the bright colors. I didn't use it as a source, but it was definitely in my mind when I painted her hair. I remember when I first encountered Leonor Fini. It was over 20 years ago, when I was in college and I was doing a report on female surrealist artists. I remember particularly Leonor Fini, Meret Oppenheimer, and of course, Frida Kahlo. I think I found Leonor Fini a bit strange,  and at the same time I was enamored of Frida Kahlo, so Fini kind of fell by the way side as I explored more of Kahlo and was  influenced by her in my own art work.

But I think Leonor Fini is worth some attention. Just in writing this blog, I have been amazed, astonished, amused and sometimes a little bit bothered by not just her work, but also her life, which was lived in an exceedingly dramatic way and far ahead of her time. She was a powerful and talented surrealist artist at a time when women simply weren't allowed to be that. In fact, she refused the title of "surrealist" because Andre Breton decided that she should be a muse, subservient, not an artist in her own right. And after her death, Salvador Dali said about her,  'Better than most, perhaps. But talent is in the balls', thereby ensuring that her stock as an artist sank quickly, in large part because she was a woman. Oy. I guess I am glad to be a woman in this time, rather than back then.

Well, I'm no Leonor Fini, but I am Rowena Murillo, and I am going about living in my own way. I've never even thought about whether I was ahead of my own time, I'm just smack dab in the middle of it and too close to the matter to worry about it. I am, however, interested in the influence that Leonor Fini might have upon my painting. Her life is a bit too dramatic for me, but the paintings? I think I like.


Friday, June 29, 2012

Rich Iced Coffee Treat and Mocha Syrup

This is one of my favorite summer afternoon treats.

It's simple to make, and delicious, and turns a regular day into a celebration.

Take some cold coffee. I make a little extra in the morning and save it for later. Make sure you take it off the burner so that it doesn't get burned. Burned coffee is not a treat. Or you can make one of those fancy cold brewed coffees that I never get around to, because I always have leftover coffee in my coffee maker. (Actually, after reading that tutorial, I really want to try it. I know where to get gallon glass jars.)

Pour your coffee into a glass and add milk or cream to your desired lightness. Or leave it black if that is your taste.

Add ice.

Add a scoop of vanilla ice cream. Coffee ice cream also works. As does chocolate. Truth is, the pictured coffee has butter pecan ice cream, because that is what I had in the freezer.

Pour on some lovely chocolate syrup. Here is where you want to be careful. I find that regular hersheys syrup is not that good, but dark chocolate hersheys is works well. I also don't like mine too chocolatey so I add just enough for a slight sweetness, but if you wanted yours more mocha, add more chocolate.

I did not use store bought chocolate syrup here. I made my own, because I have been feeling disappointed with store bought varieties. It was very easy and is very delicious. And I added coffee too my syrup because I wanted it to be a bit darker. Here is my chocolate syrup recipe, which is technically, probably a mocha syrup.

Mocha Syrup
1/2 cup water
1/2 cup strong coffee
1 cup white sugar
3/4 cup cocoa powder
1 tsp vanilla
pinch sea salt

In a heavy sauce pan, heat water, coffee and sugar together over medium heat, stirring frequently, until sugar is dissolved. Simmer for a few minutes. Add cocoa powder a bit at a time, whisking into the sugar syrup until incorporated. Add vanilla and sea salt. Simmer for a few minutes more.

Let cool and pour into a glass jar for storage in the refrigerator.

According to my children, who got to taste the syrup before bed, "Mommy! I will DIE if I don't get more chocolate syrup!" It's that good. Or they're that dramatic. Not sure which.

This is a syrup and does not get thick in the refrigerator, so is always ready to pour onto ice cream or into milk or iced coffee. It is not a chocolate or hot fudge sauce, but thin like a syrup. I think this recipe could stand cutting out the water entirely and making it all coffee. I can't actually taste the coffee in the syrup, as it compliments the stronger chocolate flavor and just gives it a richer taste, rather than a mocha taste. A cup of espresso might make it a powerful mocha flavor. If anyone tries that, I'd love to hear how it works out.

Anyway, enjoy your Friday. Have a chocolate creamy treat for me.

Thursday, June 28, 2012

Blue Girl of the Wide Open Skies

Blue Girl of the Wide Open Skies
acrylic on watercolor paper
3" x 4"

Sometimes I want to experiment a little. The other day while I was painting, I liked a stage of underpainting. I have often been attracted to an unfinished looking painting or sketch, there's something about the "developing" feeling that I like. So when I started a new little portrait, I decided to go all the way with the underpainting, allow the off colors to come through... well, no, not come through, to be the painting.

This is part of what it means to me to be free in art. I get a whim, a feeling, an urge, and go with it, even if it isn't the way you're "supposed" to do it.

I feel that this is one way to discover who you are as an artist. I believe that this is what it means to push boundaries or think outside of the box or be creative.  When you get a "what if?" question, you try to answer that what if. What if I left off the finishing touches that make it all pretty? What if I let the insides show? What if I didn't use traditional colors. What if I didn't already have the answer?

Another experiment I tried here was with the color.

When I first started my painting every day exercises, I would often reach into my art bag and pull out three paint tubes, and whatever I pulled out would guide my painting for the day. It was fun to just go with the flow  and see what would happen when I put the random colors together. Sometimes it was a disaster, but sometimes, using colors that were not my "usual" color preferences opened up whole new worlds for me. It was almost like speaking another language.

I took a chance with the random colors I first pulled out of a bag with this painting, and came up with the blue and a bright yellow. It reminded me of when I was in school and the teacher gave us the challenge of painting only with complimentary colors and white and seeing what we could come up with. So I added orange to my painting and the titan buff.

I like the freedom this experiment gave me. The freedom to break away from what it's supposed to be and to explore exciting interactions of color. The freedom from my usual solutions to representation.

There is a paradox in this freedom I experience, because I have actually set myself up with very tight constraints.  I am allowed only four colors. I am allowed only 3" x 4" of space.

And yet, despite the constraints, my imagination is free to try new possibilities, new strategies, new paintings that go beyond where I was before.

Oh, I like this idea of limiting where I can go with a painting. At least until I find myself in a place where I have something definite to say, until I am ready to go deeper into something.

Give it a try. Create based on a narrow theme or with few materials. Try small things, or time limits, and within those constraints, see where your imagination and ingenuity can take you.


Related Posts Plugin for WordPress, Blogger...