Friday, December 24, 2010

Wonky Bear Dressed for Snow WIP and a Sister Kitty Modelling her Dress in Progress


Wonky Bear Dressed for Snow (WIP)
felted flannel, felted wool sweaters, felt, buttons, thread.

Still working on this little guy and on his kitty sister (who is turning into a ballerina princess).

The wonk looks better when he wears his sweater.

Yes. I made that sweater. It was a little tricky, but not too bad. My first attempt was too Springy and got handed down to his kitty sister and turned into a bodice for her ballerina dress. Hey. I believe in hand me downs. Her dress is less far along in the wip status so I will show her later. If ever I can get some time without children today.

Better hurry. I have to make rice krispie treats and brownies for Santa also.
Wonky Bear close up

I found his button eyes. I was looking all over for them, because I knew that I put them "somewhere safe." Ha ha on me. I always lose things when I put them some where safe. But I found some scraps from the flannel shirt, with buttons still attached, and it was just as good. I actually tried some larger brown buttons first, but they didn't look as eyeball-y. So I cut them off and added these. They will match sister Kitty.

His nose is not done, because I didn't get around to the embroidery. When I embroider sister Kitty's dress I will add the nose and mouth.

I used a felted sweater, using the fine ribs of the waistband to make a sweater and figured out how to swing those arm holes. Yay me. I also made what I thought was going to be a ski cap, but it turned out the wrong size, so I cut a contour into it an made it a hat with ear flaps... although why the ear flaps are down around the face when the ears are sticking out the top, I don't know.

The scarf is some nice fancy felt, just cut, fringed and tied around his neck.
detail wonky bear

Then I made his backpack.

Welcome to Sewer's Cheating 101. I took a pocket from the flannel shirt and trimmed it off the scrap. Then trimmed some of the shirt into a flap. Then I sewed to flannel strips to make shoulder straps. Voila. I might add a button to close it. And perhaps I'll write "wonky" on the tag, instead of the name of the shirt maker. I will probably do it with a sharpie. Lazy crafter, right here. Oh yeah. And I didn't hem any of this cut up felting.
And, fine, since you are insisting. Here's sister kitty modelling her dress in progress.

Thursday, December 23, 2010

Wonky Bear WIP

Wonky Bear WIP
felted flannel, upcycled velveteen, thread, fiberfill

Shhhhhh. I'm making a bear for Gabriel. It's been a rocky road, if you can tell. My flannel, which was from one of his old shirts, size 3, was too small to make the body and legs all in one piece, so I created a pattern out of my head, with all my brilliant fabric engineering ability. Ahem.

Thus the wonk.

I kind of like the wonk, but I don't know if he will. If he doesn't like it, maybe I'll try again with a different fabric. I do kind of like making stuffed animals, so it could be worth it.

Anyway, I still need to find his button eyes. I put them somewhere safe after giving Ivy's kitty cat sight. Now I don't remember where I put them. Curses. And I need to use embroidery floss for his black nose, not regular thread, which I first tried.

And I have to make him a jacket, scarf, and backpack. I also have to make Ivy's Kitty cat a skirt, jacket and probably a princess crown. I hope I have time.

In case you haven't noticed, tomorrow is Christmas Eve. And if I can, I'd like to finish up the bunny and snake I started for last Easter and never managed to complete. They've been floating around the house, with the kids asking, "when are you going to finish my bunny? when are you going to finish my snake?"

Yipes.

Oh crap. I also have to wrap the presents.

Curses.

How is your Holiday season going. It's almost over. I don't know if that's a good thing or a bad thing.

Wednesday, December 22, 2010

Beaded Felt Christmas Star

Beaded Felt Christmas Star
felt, thread, cardboard toilet paper tube, glass beads, white glue

I only have a moment to post, so hi.

Here is the christmas tree star I was working on. I cut out four felt stars folded them in half and sewed them together at the edges with a blanket stitch. Then I beaded two sides of the star.

I had thought about making the four sides stick out, like I did with the previous felt ball ornaments, but I thought I kind of lost the star effect, that way. After some consultation with my facebook peeps, I decided to use the toilet paper tube to finish it off.

I glued felt to the tube and when I put the tube inside of the star, noticed that it kind of naturally opened up a bit on two sides. I realized that I could leave it a two sided star by attaching to two top side points together.
Like this.

Therefore, all four felt pieces are connected at the top. The bottom is left open. And then the two facing points at the top are attached on each side. When I tried to connect the bottom points, it completely lost the star shape, so I left those as is. Then I stitched the open end of the star to the tube.

The tube holds it up on the tree top. yay. All done. The beading took a long time.

Monday, December 20, 2010

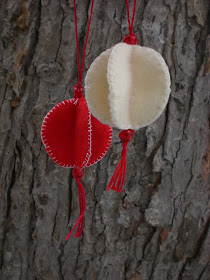
Felt Christmas Ball Ornaments. With Tassels.

Felt Christmas Ball Ornaments. With Tassels.
felt, thread, embroidery floss, bead.

I am getting tired of Christmas, and it isn't even here. And I am not even slightly done with preparations.

Bah humbug.

This could be partly because I took on another freelance project that I have to squeeze into my busy days before Christmas eve. Sigh.

But anyway, I'm still going. Still making Christmas stuff. Still crafting. Still thinking. Still celebrating or trying to remember to celebrate. Meanwhile, most of us here in this house are suffering through some stage of cold/virus/illness. I'm on the recovery end, but you know, when someone suffers, mom suffers.

Tomorrow, I have a Christmas star to show you. It took a while and quite a bit of engineering. Sometimes I feel like a felt engineer. I get an image in my head, and try to figure out how to make felt or fabric fit into my image.

Anyway, if no one gets sick today, I hope to take the troop on a Christmas shopping trip and finish up with the big stuff. Wish me luck.

As for your holiday preparation and crafting and creating, I hope it's all going well.

Saturday, December 18, 2010

Crafts and Activities with the Kids

Frosty the Snow Man

This year, I have bee trying to keep up an advent calendar. But I'm trying to make Christmas not about materialism and toys and getting presents. I'm also trying to avoid giving my candy addicted kids yet more candy, so I've been trying to do a new Christmas related activity every night. So far, I am keeping up, with a little bit of adjustment.

I don't always have energy or time at night before bed to do the activities I have listed, so with my sneaky mommy ways, I have left my little notes of activities out in a cup. I choose the activity for the night right before I open up the advent envelope, and stick it in there before I read it to the kids. I can get away with this because they can't read yet. There is a limited time for this kind of subterfuge.

But it enabled us to make snowman building an activity on a snowy night. You can't plan ahead for snow.
And last night we decorated the Christmas tree. It was time.

I might also point you to the little blue tinsel pipe cleaner snowman. This was an activity, too. The kids and I made ornaments.
Here's a Christmas tree made at the same time. I think we managed 4 trees and 3 snowmen.


Another activity we did, and another Christmas craft, I might add, is to make popcorn strings. Good old fashioned pan popped popcorn, which was an event in itself, and needles and string. I was surprised how good the kids were at stringing the popcorn. I thought they would be too young, but they weren't. Maybe they are ready for cross stitch or some other kind of needlework fun.Here's an ornament I made without kid intervention. You can't see from this picture, but it's glitter on one side and felt on the other. These are the stars I made for my wreath, but hung on some bakers string for the tree.
After I made the stars, I saw a raindrop online somewhere and decided that I wanted to add a raindrop shape to my stars. So I did. You can see a little bit of the halo from the opposite felt side as the Christmas light shines through it.

All in all, I rather like the way our little tree looks, a mix of handmade ornaments and grandma's vintage ornaments.

You really don't need a lot of money to decorate a Christmas tree. One year, when I was on break from college, I decorated a tree all with paper. Silver paper fans. Crepe paper flowers. Paper drink umbrellas. It was all in peaches, pinks and yellows. That was a good looking tree. I think I made an angel for the top.

This year, I have to figure out a way to make a star. Must puzzle through this. The girl demands a star.

Friday, December 17, 2010

Little Snowy House Ornament and Tutorial

Little Snowy House Ornament
acrylic paint, glitter glue, sharpie marker, upcycled menus (cardstock), thread.

Hi! I'm a little snowy house.

Here is my tutorial.
First sketch out the design. This is an easy design. All walls and floors are one inch squares. The triangles for the peak were drawn to fit into the spare scrap paper, so are about 1/2" high but were eyeballed, probably not the best idea. Then I measured the peaks along the diagonal to figure out the length for the roof sides. Tabs for glue are eyeballed and drawn in.
Cut out the drawing.
Score along the pencil lines where I will be folded. (note: do not score the line below between the triangle and square... that line will NOT be folded. In fact, erase it before you start to avoid confusion, so you are left with a house shaped side, rather than a triangle on top of a square.)
Crease along the scores and put glue on the tabs. I am glued w glue stick, but a different type of glue might be stronger.
Fold edges and press glued tabs into their appropriate sides. The last wall is the most difficult. A thin blade or needle might help to press the glue. Muddle through as best as you can.
Uh oh. It turns out all the eyeballing did not make for a very tight fitting house. I should have measure the peaks. Oh well. I guess I'll have to figure out a solution.
Voila! Little house gets a glue and sparkle joint fill. Not by coincidence, it looks like a snowy roof. Yay glitter glue! I continue and outline the roof along the joints, and then flood the outline with the glitter glue. Like frosting a cookie.

Here it is with the snow roof and a red door. In the background, you can see the supplies of glitter glue and glue stick. I should have painted this little house before adding the glitter glue, but glitter glue makes me excited and I jumped the gun.

Oh yeah, little house is resting on my original sketch, when I was trying to figure out the engineering for a house shaped paper box. Floor, walls, peaks, roof tops. I eyeball things usually, and make them up as I go along. And figure out fixes for my imprecision, which is why I don't often do tutorials. But hey, why not include that in a tutorial.
And here is the finished little house, after the glue dried over night. It took a while. And then I forgot to show my process... but it's not that complicated. I got out some naples yellow acrylic paint (Golden fluid acrylic) and painted the walls around the glue. Then when it dried, I drew in the windows. Then I went back over it and painted in the window panes in white acrylic.

To string it up, I threaded a needle through the roof, right through the top. I think it would look better with ribbon, but I didn't have any I liked, so added a yarn bow to attach it to the tree.

It would have been cute if I had made a chimney and had the yard coming out of it like smoke, but just adding that little detail would have made this little house a much more complicated undertaking. Thus... simple little house. With snow

And thus I have given you my tutorial. And pardon for the fuzzy pictures. My own little house is covered with snow, which blocks the skylights that I usually depend upon for lighting.

Thursday, December 16, 2010

Joy

Joy Ornament, felt medallion
felt, embroidery floss
25 days of creativity

I made this little ornament the other night. Two shades of red felt and some pink floss. There's something really soothing about hand sewing, particularly when you're not anxious about how you're going to put together all the pieces. Making stuffed animals is gratifying, but I'm always figuring out the engineering as I go along, so it can make for some stress. But these little medallions are great. Cut three circles. Embroider and/or applique two circles. Sew all together with simple blanket stitch. Add a string.
Here's the other side. Is it the best embroidery in the world? Nope. But my good intentions go into them. I like to think of them as lucky charms, actually. They can work as Christmas ornaments, but just as well they can be reminders of something you want in your life, joy, luck, love. I often send them out with my prints when people order. This one was a gift with order, which explains the not-great photo, since I did it at night and photographed it by lamplight and sent it out the next morning. Sometimes I send out bookmarks, instead. Or whatever new project I'm working on that will fit into an envelope.

You never know what you're going to get with me. Ha ha.

I guess that's just like life. I finished the work project I had, but now I have a cold. Cough cough . Oh well, we must soldier on. Keep on creating. Have fun. Did I just say have fun? Cough cough wheeze. Hey, I should listen to my own lucky charm. Joy. I said Joy.

And have a happy December.

How are your 25 Days of Creativity going?

Tuesday, December 14, 2010

Kitty WIP

Kitty.
upcycled scarf, felt, fiberfill, thread
WIP

So I have to post very quickly because I have much to do before work this morning and I can't let the girl see my computer screen, because this is her Christmas present. Or it will be when I finish.

Her face is mostly done, but for maybe a stitch here and there for shaping. I'm still considering whiskers and probably won't add them... but maybe I will.
Kitty detail

I'm still planning to do an outfit for her. A dress or skirt. A jacket. A scarf. A hat.

What can I say. I like to accessorize.

I like the way she came out, although she's kind of funky in the proportions. And the eyes look great, I think. They are buttons that came off of the plaid shirt that will be the bear I'm making for Gabriel. I've run out of fiberfill, so I will probably do the outfit for Kitty before I start the bear. And I think I'll use a different pattern for him, because the plaid shirt was a size three and I ended up with smaller pieces than I did with the scarf, which was narrow, but long. I also felted the scarf... the flannel shirt was pretty well washed already, but I did my best.

And the pictures aren't great since I did them while the girl was asleep with lamplight and it's hard to do a photoshoot with a present you're trying to keep secret from the girl who is always into everything.

Anyway, how is it going with all your craftiness? Creativity? To Do Lists? Keeping up with yourself?

Monday, December 13, 2010

Ornaments, in glitter, felt, and tinsel pipecleaners. Move over Martha.

Glitter, repurposed menus, and felt ornaments, strung on baker's string, w old buttons

I am so far behind on this project of 25 creative things in 25 days. Or maybe I'm not that behind, but I am behind on posting. So here I've decided to show a couple of the ornament bundles I've made.

I took some of the glitter stars from my wreath and glued felt to the back. I thought for a different look when they go up on the tree.
Felt stars and raindrops.... the other side is silver glitter.


Tinsel Pipe Cleaner ornaments

I also made a string of these... I made both swirlies
And hearts.

Now the truth is, I probably won't use these as garlands, although I've strung them up for display and storage purposes. But we don't have a Christmas tree yet. We meant to get it this weekend, but between my work and bad timing and snow storms and all... we haven't gotten it yet.

I've also made some ornaments with the kids. We used more tinsel pipe cleaners, but they chose what they wanted to do, and it was little christmas trees and little snowmen. Not a bad project for those 5 and under, since it's so easy to manipulate pipecleaners. I think I hid those before the kids could destroy them. I need to find them and take a picture. They actually turned out pretty cute.

This years Christmas tree will be a motley of stuff. But that's okay. Sometimes I like the motley.

I'll be back later. Who knows when. I'm turning out to be not so good on these daily posts this holiday season.

How are you doing with your Christmas projects and activities?

Are you feeling the cheer yet?

Wednesday, December 08, 2010

A Partridge in a Pear Tree.... sorta

Wreath
paper garland, berry light string, wire hanger, ribbon, paper clay doo dads.
Day 8, 25 days of creating

Yesterday, I pulled out a bag of holiday ornaments that grandma gave us before her move. I said, hmm. What can I do with these pretty lights? They're not long enough to put around the window. Then I thought, "a wreath"

And I remembered the garland, a nice soft natural color. And I bent the hanger into a wreath shape and wrapped it all up and tied it with a bow. I left it at that, until I realized later that I had some little paperclay things I'd been working on and hadn't done anything with.
If you look close, there's a bird, a set of wings, and four little pears. I figured, it could be the partridge in the pear tree.

I found it really hard to take a picture of, because the light is so gray and cloudy, and I can't take them out anyway, since it's already plugged in. I guess I could have unplugged it and set it on a tree... but you know it's kind of snowing, and I'm kind of lazy today.

Anyway, here's to another day, of creating, of the holidays, of living.

Remember to breathe deep and relax, amongst all the celebrating.

Tuesday, December 07, 2010

Felt Ornament

Felt Christmas Ornament
Day 4 of the 25 days of Christmas Creativity.

Where have I been?

Well, I've discovered a flaw in my brilliant plan to post daily christmas crafts. Lots of flaws.

One, borderline burnout from busy November.
Two, Family obligations. You people. Your warm loving embrace is getting in the way of my craftiness.
Three, WIPs. I don't have photos of everything because I'm still working on it.
Four, presents! I can't post presents unless the recipients are guaranteed to not see them online.
Five, stupidity. I just made another ornament and packaged it up for a buyer, and forgot to photograph it. It was cute, too! I embroidered "joy" on the back and quilted a pink star on the front.
Six, busy-ness. I can't post. I have to get to work! Ciao

Friday, December 03, 2010

Tiny Pink Owl. Gift #1!

Tiny Pink Owl
felt, embroidery floss, thread, fiberfill

Only moments to post before I go to work, so let's do this quick.

A Christmas present for the little girl. She asked for a Pink Owl, but I think she means a larger one that she can cuddle. I have a soft spot for minis, though, and only had time or supplies last night to make this mini owl. I think she'll like it, even though it's tiny. I am wondering what to do with it. Leave it like this like a doll toy? Or sew a pin on the back so she can wear it on her shirt? Or attach a hair pin so she can wear it in her hair? Or a chain, so it can be a necklace? Maybe I'll add a little loop at the top so it can be strung on a necklace, or played with solo.
Here's a close up. Tiny tiny stitches.

Thursday, December 02, 2010

Handmade Wreath

Handmade Wreath
green twigs, repurposed grocery boxes, gesso, glitter, brass paper fasteners, silk ribbon

Hi there!

Welcome to Christmas.

I'm a handmade wreath. I cost about 50 cents. Because I bought paper fasteners this week and didn't have them on hand, but I had bought them for something else, so really, this cost nothing.

This was actually kind of fun. I went out to my yard and cut some twigs from a bunch. I think they might actually be considered canes, because they were long and straight and bendy and green, and headed straight for the ground, where they tried to set and root. They were starting to take over my driveway, so I felt fair in pruning them back.

I'm sure you could also use willow branches for this. I know this because I used willow branches to make a very similar item, when I was planning to make a handmade dream catcher, but never did because the grandparents came back from Arizona with authentic ones.

I twisted them around each other, weaving them in and out to make a circle. I think I used about a dozen canes. I thought I'd like a bit looser, but I began to enjoy the tight wreath. The only thing holding them together is the weaving.

Then I got my cut out stars, from grocery boxes, that I had already gessoed, painted with gel medium and coated in silver glitter. I punch tiny holes in the stars and then grabbed my brass paper fasteners... stuck those in there and attached them to the twigs. I can actually swivel the stars to make a better layout, and I did.

Then I found this pretty gold silk ribbon and tied that up at the top. I'd already tried about three different ribbon/fabric options. The tulle was too fussy for me. A plain cotton twill ribbon thing I had looked too much like a bandage, and then I found the gold ribbon, and that was it. I like how it brings out the brass in the fasteners and both bring out the goldy brown in the canes. The ribbon might be smaller than I might have chosen otherwise, but I think it adds a simplicity, a modern quality that I rather like as does the mix of metallics.
A close up of the silver stars against the blue-green door. The photos are not great, courtesy of my northern, cloudy skies. Sorry. I have no time for better photos. I've set myself on quite an endeavor with this craft every day thing. The photography turns out to be almost as much a challenge as the crafting!

Oh and this project took me about 20 minutes. Although I had four of the stars made already, and just had to glitter the last one. I like odd numbers. They feel better.

Wednesday, December 01, 2010

Home Made Advent Tree

Advent Tree
found branches, glass jar, yarn, envelopes, glitter glue, paper fasteners.

Whew!

My first item for 25 days of Creativity (or 25 days of Christmas, if you want to go that way, which I kind of do) is this Advent tree. I was inspired by all sorts of things, but mostly by the materials I had on hand and which would look the best, work the best, and take the least amount of time. Shhh. Don't tell. I take short cuts.

Like the envelops I bought and cut in half, instead of making my own envelopes, tubes, cones, or what have you. Come to think of it, cones would have been super cool. (my repurposed menus would have been brilliant for that)

Or the glitter glue that I found and decided would be easier than paint, or glue plus glitter, and prettier than marker.

And I just went out into my yard and grabbed up some deadfall twigs. Yay for not being a good gardener.

Plus the big glass jar is swiped from the recycle bin at work, and is heavy enough to hold the glasses, but I had some of my kids collection of rocks that would have held them in place if it wasn't sturdy enough.

Oh, and I used my crochet yarn, instead of buying ribbon or twine or hooks or whatever.
Here are the tools.

I cut the envelopes with decorative scissors, and folded/or cut them into shapes. Plain would have been fine, I think. Then I drew on numbers in alternating red and green. One color would have been chicer, but I chose red for the girl and green for the boy, so they know which one they will get to open.

And instead of using candy, which was my original plan, I decided to do activities for the kids. Like "string popcorn" or "go to the Christmas parade on Main Street" or "make cookies" or "get an extra bedtime story".

I decided that the traditions will be better than the candy. As will the time with mama or papa.

And there I go.

How are you doing on your Holiday crafting adventures? Bear with me while I get the side bar up and links all made. I have a boat load of work to do. On my next break, I'll get to the side bar.