Tuesday, July 31, 2012

DIY Harry Potter Wands II: Paper Mash, Kraft Paper, String and Paint.


 Paper Mache Harry Potter Wands, embellished with paper pulp and paint

Welcome back to my Harry Potter Wand tutorial. Part two.   Yesterday was part one. Check here for how I made the paper wand blank and for how I embellished some of the 21 wands. Today I'm going to talk about another embellishment technique that is a bit more labor intensive, but ends up with some impressive results, in my opinion.

This is the paper pulp portion of our adventure. There are many ways to create with paper mache. We start out when we're kids, maybe, with the water/flour paste and strips of newspapers on balloons, sometimes we might move on to fancier paper or fancier glue. And then there is the paper pulp fun, where you take little bits of paper, soak them in water, mix them with some sort of fixative and then mold them like clay.
 That is what I did here. I used this tutorial for paper pulp ala Miranda Rook. It takes some cardboard egg cartons, some glossy magazines, water, electric equipment (mixers and blenders) some big bowls or containers for soaking and mixing, and strainers... a colander and cheesecloth or stockings will do.

I'm not going to do a tutorial for this, because I pretty much just followed Miranda Rook's instructions. Plus I forgot to take pictures and hers are great.  I wasn't sure how well it was going to work out, so I only did a fraction of her recipe, using one large 18 count egg carton and about half of a small glossy. It didn't make nearly as much as hers, but I knew I wouldn't need so much for just a few wands and wasn't sure if I'd use it again.

So after soaking my paper and combining it well with a mixer, I took a bit and mixed it with my white glue to make my first batch of wands. Since I did my wands in a couple of batches, I followed Miranda Rook's instructions on storing the pulp and rolled the leftover into these little balls that I set out in the sun to dry.
 They dried well and made nice hard balls. I followed Miranda Rook's instructions again and took a few of the balls and set them in my bowl with some water. Not too much because I didn't want it to be soggy I just wanted it to be mashable. I broke the balls apart as the water made them soft and kept breaking them up as I added small amounts of water.
 Then I added more of my trusted white glue. I mixed this with my hand mixer. If it were a bigger batch, a stand mixer would work better, but I was working in small batches so it was okay for me. I blended it until all the glue was mixed in and if it wasn't mashy enough or sticky enough I added more glue. MORE GLUE! (this has been my refrain the last few weeks.) The one thing I would have liked to do with this mash was to blend it even finer with a hand blender or in a regular blender. My blender was broken so I went with the bumpy mash. It adds a nice texture, but I would have like to have seen what could have happened with a smoother mash.
Once mixed well with the glue, I got out my wand blanks.  Yesterday, I mentioned that it was okay if some of your wands weren't perfect. If they were wrinkled or bumpy.  This was the first wand my son made and he got upset because it was all wrinkled. I told him not to worry, because I could almost see The Elder Wand in the bumpiness. Instead of trying to straighten it out and smooth the wrinkles/bumps or just tossing it in the garbage as a loss (it is only glue and paper, after all,) I emphasized the wrinkles, squeezing and smooshing the original blank into something that was less sleek and more organic looking. Then I took out paper pulp and added more pulp to the bumpy parts, emphasizing them, smoothing them on, compressing them around the bumps and adding a nice hefty clump of mash as a handle.

In the end, this was the "messed up" wand. It's a beauty. And the one my son actually chose for himself. I chose the most flawed wand blanks for the paper mash. I worked with the wrinkles to make them unique and give them personality.


Some were too wide, so I made them wider and solid.


Some did not have round shafts, so I made them more angular.


Some didn't have enough glue at the grip side, so I covered the soft paper with the bulky pulp which dries very hard.  The soft handle was actually a common problem I had, and paper pulp was not the only solution for this problem.

And that brings us to another family of wand embellishments.

 Wrapped Kraft Paper Handle Harry Potter Wands

This is a simple embellishment and all it takes is a strip of paper bag and more glue. (MORE GLUE!)

You want to cut your brown bag/kraft paper in a slight taper so the outside edge is narrower, because that will make the hand a little bit graduated on the wand. Add glue liberally and roll it tightly to the wand handle, much like the original wand construction. Smooth out the wrinkles and bumps as you go and when the whole handle is wrapped, smooth the glue out.

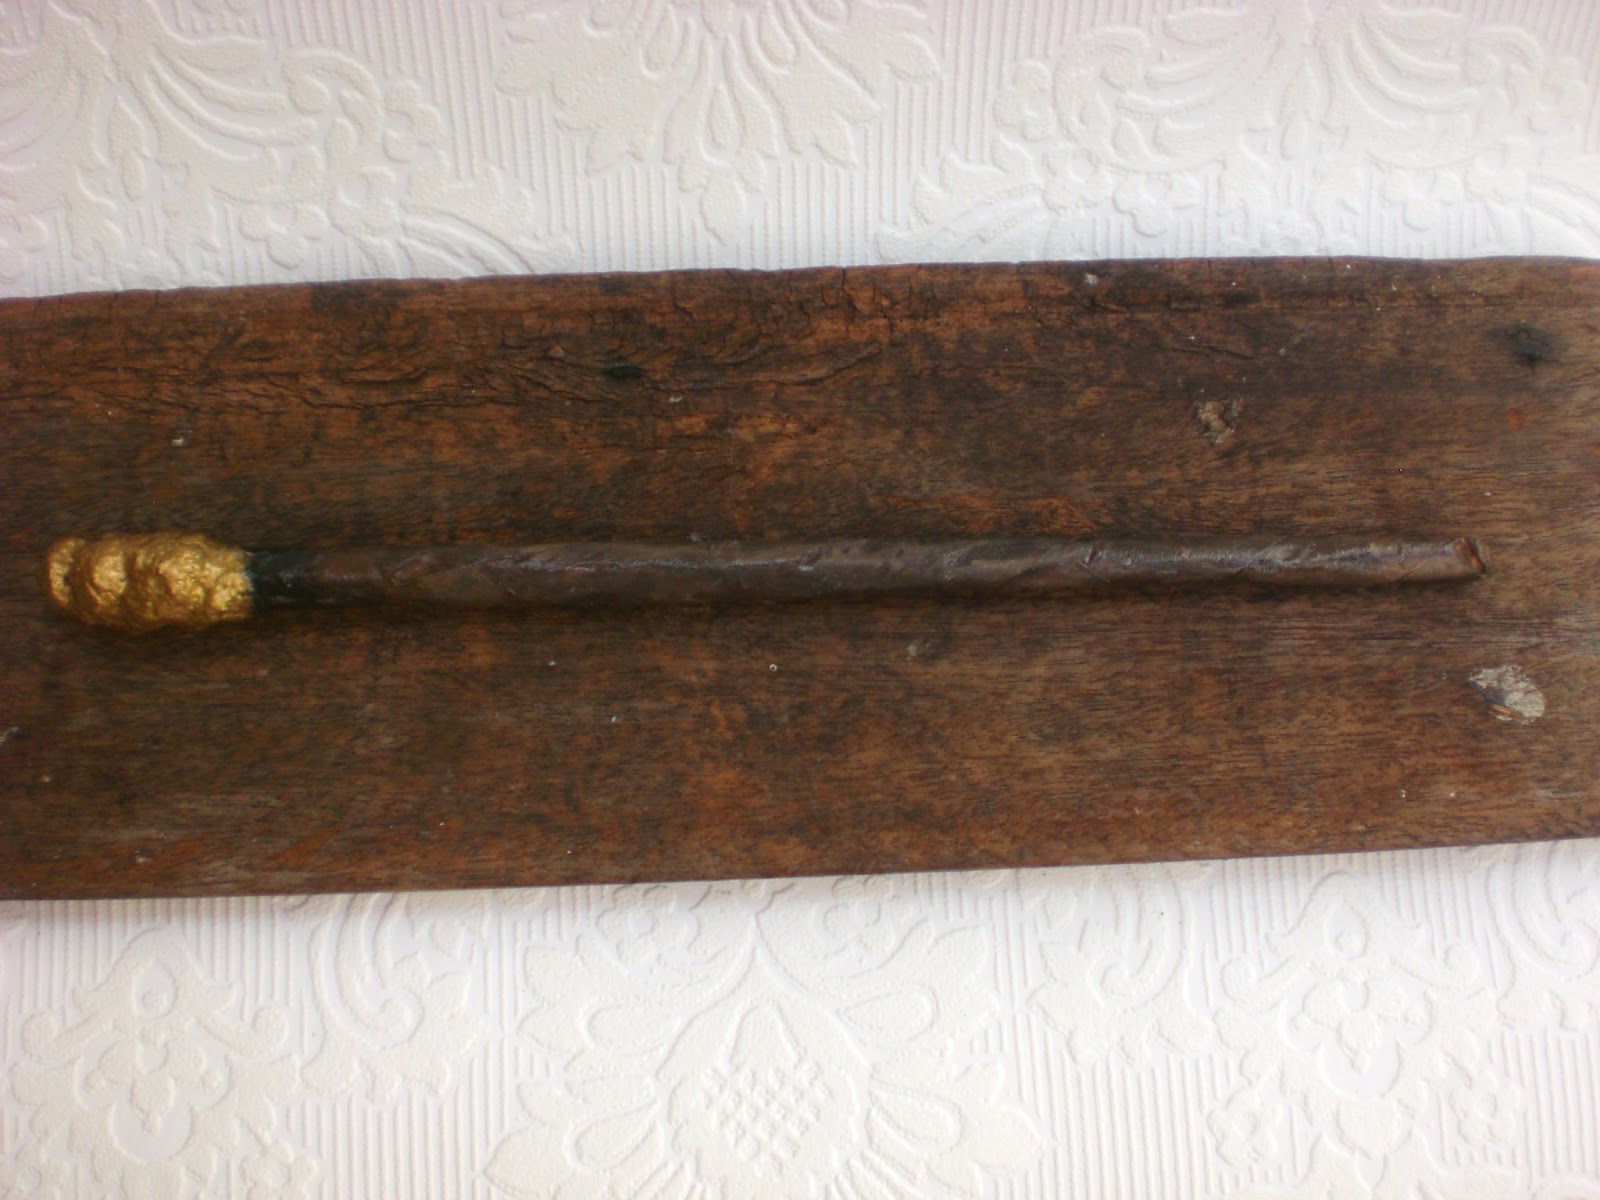
For most of these paper bag wands, I added a twist for a pommel gem or where the grip meets the wand, but I didn't do it for all of them. It's just another embellishment. For one of these, I dipped a braided cord in glue and wrapped that around the top of the handle.

And that leads me to the last of my embellishment catagories.

 String Wands.

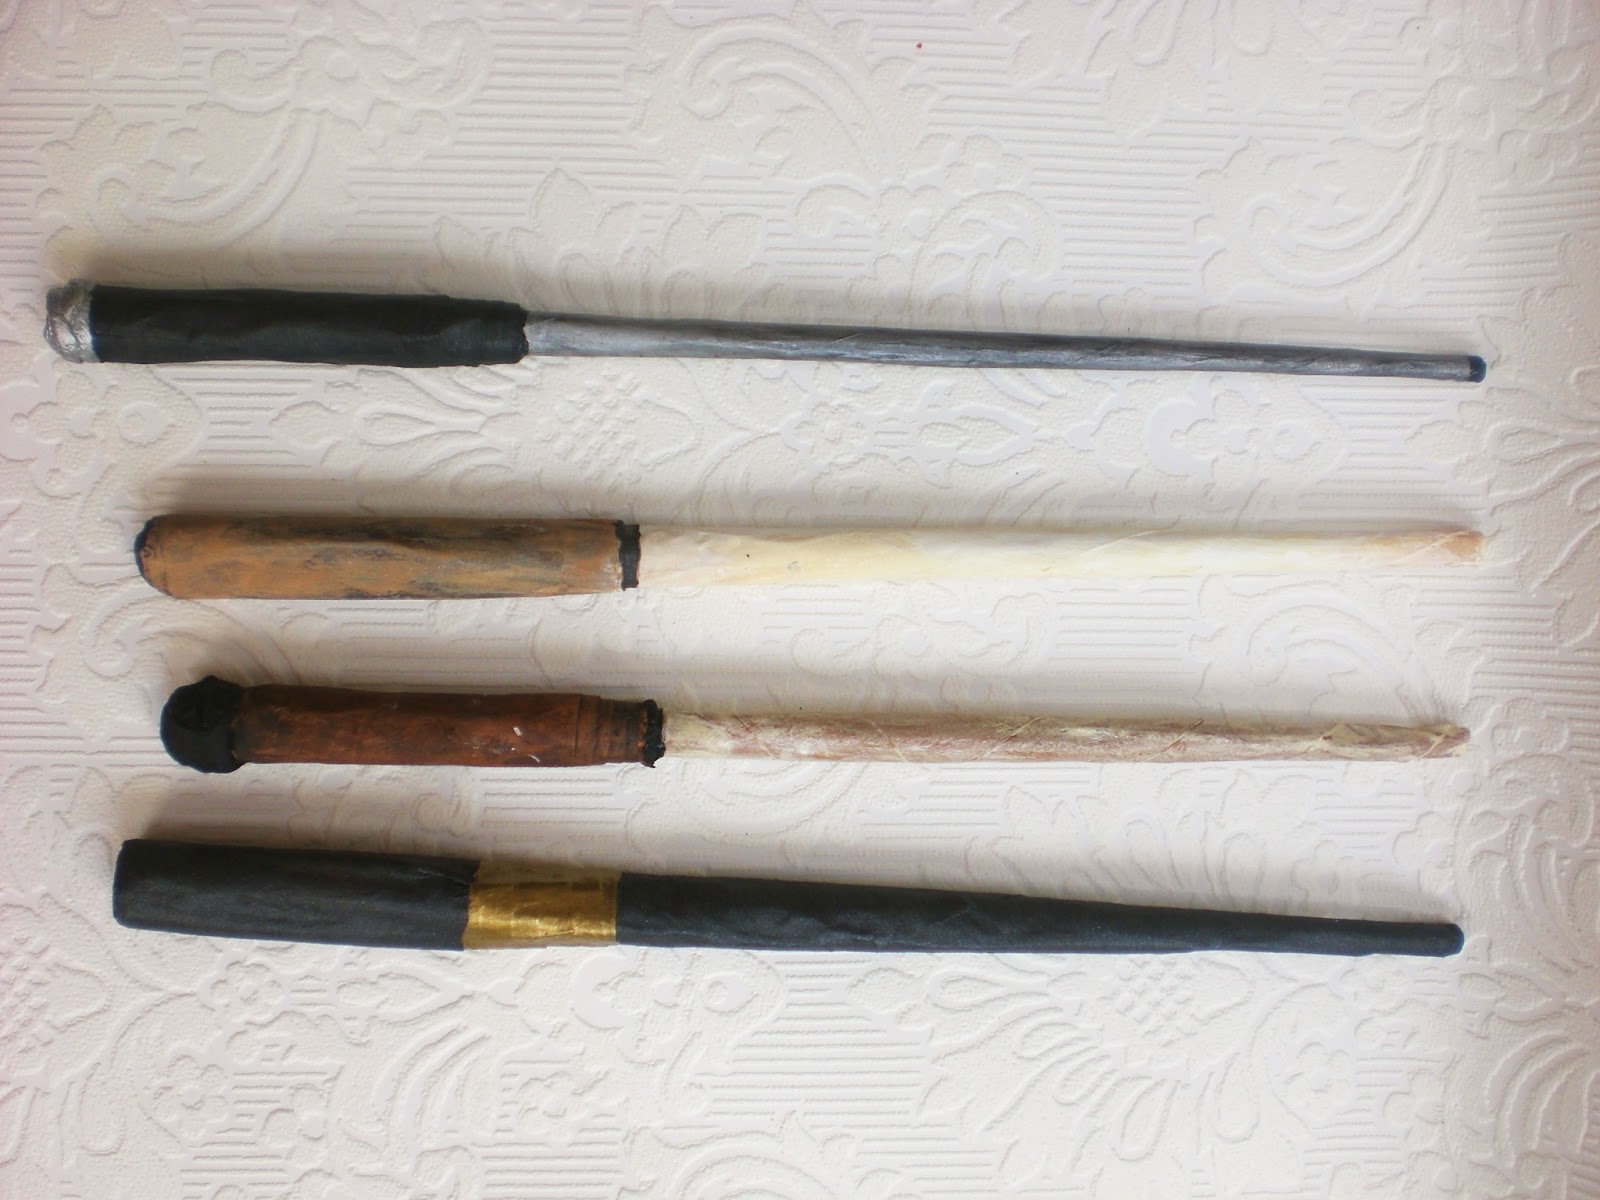
This is my least favorite embellishment. Sorry. It's easier, but I found that it had the least modelling capability and the string dries hard, with a distinct string texture. It works, but it's not my favorite. The silver one was yarn, and the yarn and glue together made an almost rough texture which reminded me of metal. That's why I made it silver. The bottom one was cotton twine and while I kind of like the way it looks on the handle, I don't like the way it feels when I grip it. Well. We'll see if any of the kids choose my least favorite wands as THEIR favorite. Shh. Don't tell them these are my rejects. One person's trash is another person's treasure (says the avid repurposer.)

I suppose at this point, I should talk a little bit about the painting techniques. I do not have any tutorials for these because I just went on my gut and my hands were really messy and full of wands and paint.  But if I think back over it, there are really only two techniques I used.


The easiest is the flat effect. This is just an opaque layer of paint in one color. It might or might not have a layer of glossy mod podge (I found it too sticky for grips, so it was only on the wand shafts) or gel medium or even a glaze of iridescent fluid acrylic.  Silver, black and gold gave the best flat effect, I found.


And also I had a dark mica paint that I got many years ago and doesn't work for when I paint pictures. This was the perfect use for it.


A bit more difficult was the layered paint effects. This consisted of a base coat and then one to multiple (and I do mean multiple) following layers of thin paint that I then rubbed off with my hand. I found using my hand made the best effect sometimes, avoiding brushstrokes and giving it a more natural variegation. Plus, I was careful not to use too much paint for each layer, because it doesn't rub off very well if the paint is applied thickly.

I found the layered effect worked best with browns, tans, ivory and white. Blending the colors gave a natural wood or bone feeling. And sometimes I found the browns too flat, so I would dab on some orange with the brown/tan and blend it on as I went.

I found that adding the lightest colors first, and then putting on darker layers as I went worked the best, although a little bit of lighter color added to a darker color could also give a feeling of age/dimension.

Whenever a wand didn't look right, I would just add another layer of color until it made me happy. Sometimes that meant a solid layer of color changing the entire color scheme. Sometimes it just meant another thin layer of brown that I then wiped off


And then there's my daughter's request. A pink wand. And I had to get over my resistance to the pink wand (Harry Potter wands aren't PINK!) and find a way to put it together. This wand is actually a graduated base layer of orange blended with white, a little bit of tan, and then an iridescent glaze on top. The blue iridescence altered the orange to a vaguely pink color. Win!

I wish I had the presence of mind to photograph the painting techniques, but I was too involved in the actual painting, which is often that case when I craft.

If you have any questions, feel free to comment and I will answer. Also, I'd love to see if anyone makes a wand with any of these hints, or finds new solutions or new embellishments or new techniques. They can be lots of fun to make and they look so impressive considering the materials and effort involved. I mean,with a little bit of paper, glue, and paint, you too can be called Ollivander.

To check out the previous post and see all of the 21 wands, click here.

Monday, July 30, 2012

DIY Harry Potter Wands, No Glue Gun Necessary

 Twenty One DIY Paper Mache Harry Potter Wands

Ta-Da!

I finally finished all the paper mache wand party favors for my son's Harry Potter birthday party.

Wow. It was quite an endeavor. However...wand making is not as hard as it seems. I think it was the number of wands that made it a big task. I thought that I would do a post that explained how I did it, but I soon realized that it would be a HUGE post, since not only did I make the wands, but I used a few different methods for decorating the wands. So I've decided that I will break this post down into two posts. It will still be long, but not quite as long.

So. First step.

Make the wand forms.  This is not the pretty part. This is the part where you go, "how is this paper tube going to end up being a cool wizard wand." I gave you a sneak peak of my process here, with a photo of some unembellished paper tubes along with some that are already decorated and painted with an underpainting.

I started out with this tutorial from Dadcando (great reader examples here).

Materials needed

Plain Copy Paper (can be recycled)
White Glue (LOTS)
Double Sided Tape (optional)
Skewers or Chopsticks for stability (optional)

This is one plain piece of copy paper with a piece of double sided tape placed kitty corner near one edge of the paper. I did this for my kids, to help stabilize the paper as they rolled it, but I did not use the tape when I was making it myself.

Then I take a few bamboo skewers (these are thin so I used three) for stability. I have also used chopsticks here, but I had more skewers. I did wands at Christmas without skewers, and while they looked lovely, they weren't that sturdy, and now (8 months later) are bent and broken, much like Ron Weasley's. They would be fine for display or for adults, but not for children with active imaginations and who enjoy vigorous wand waving and sometimes forget to put them safely away. I believe the skewers will help with this problem.

 I start the skewers at the bottom corner and roll them tightly into the paper. The tighter you roll them, the thinner your wand will be. Try to keep the paper straight. This will create the basic shape of your wand.

 Take your paper with the skewer rolled in one end and take your nice ubiquitous white glue and squeeze a whole bunch of glue all over the paper. You want it to be a heavy but even layer. I did not smooth the glue out, but I did make sure that each section of the paper was liberally covered. This glue layer will harden and give your wand the solid feel. Because without the glue, it's just paper and you will feel the paper.  Make sure you get those corners, too, because those corners have the fewest layers of paper/glue so need to be firm on their own.

This is also the trickiest part in rolling, because the glue can get slippery, so make sure you are rolling smoothly. Avoid wrinkles if you can, because they will be visible in the wand (although, you can actually work with a badly wrinkled wand to create something with a more organic shape. I will show you how I did this in a later post.)

Roll the paper all the way to the end and smooth the glue all around the wand tube, getting rid of as many wrinkles and bump as you can.  It's okay if it's not perfect because imperfections add character to the wands. There are skinny wands and fat wands, smooth wands and bumpy ones. Sometimes, my kids created fat tubes and cried about them not being right. I told them not to worry, and then stuffed the mostly empty tubes with more skewers to give it more stability. Stuffed as many as I could fit down in there. Hey. It worked.

Let your wand tube dry. Then you can continue your embellishments. Once they are dry, you want to snip off the ends of your wand, which will be pointed, with the corners of your paper. You want them to be flat and round. This is the point where my technique differed from the one on instructable. My glue gun bit the dust and I didn't want to go out and buy another one, because frankly, I found the glue gun to be a PITA from the get go. I think it was a bad glue gun, but even so, I managed to figure out my own non-glue gun method that works pretty well.  It entails more white glue and tissue paper. That's it.


The first thing you have to do is plug the hollow ends of the paper tube. Take an appropriately size piece of tissue paper and crumple it up into a ball.

Dip the ball into elmers glue (that's my glue palette below the ball. I'm using a plastic lid) and smoosh it up until it is a squooshy, glue filled wad.

Smooth it with your fingers so it fills the hollow all the way. It doesn't matter how it looks, you'll be painting it over later. Only the texture matters. If it isn't smooth enough, drop another bead of glue on it and smooth it some more. The tissue and glue together end up making a kind of dough like consistency, almost... paper mache. This is a messy process, just so you know. Glue all OVER your hands.

Plug both ends of your wands. You might have to fiddle with different sized paper wands to find the right plug, but it's not that difficult and it's just tissue paper. Once the wands are plugged and the glue is dry, you can add your embellishments.

This is what my paper tubes looked like after I added embellishments but before I painted them.  For this post I am going to continue with the tissue paper method and show you the embellishments I made with tissue. There were two types.


 Twisted Tissue Paper Wands

The first type was made with a long strip of tissue paper. I squeezed a line of glue out in the middle of the strip.

 Then I folded it up


 Twisted the fold, and added more glue. Twist it with your fingers until it is a tight twist and the glue is well mashed into the paper.


 Twist it around the wand until it looks the way you want. Add more glue if needed and smooth the twists out with your finger. It is very moldable when there is enough glue. If there's not, add more. If there's too much glue, just smooth it over the wand with your fingers. More glue will not hurt it just try to keep it smooth because bumps will show through the paint later. You can add as many twists as you like. Be creative. Then let it dry and you can paint it.

Molded Tissue Paper Wands

This is done with much the same technique, and starts the same way, but rather than spreading the twists out along the wands, They are bunched up all in one place.

 Here it is, with the twist wound up around. You would still be able to see the twists at this point. It looks almost like a turban. But if you would like to smooth it out more, add more glue and with your fingers, mold the bump into a shape that pleases you.

Here it is all smoothed out. To me, it looks like a bead. I like to place a bead at the back, like maybe a gemstone, and then a bead at the top of the grip, to keep a wizard's hand from sliding up the wand.


Again, at this point you let them sit and dry. When they are dried you can paint them, and that is where the magic happens.

Here you can see both the twisted paper and the molded paper. I had some orange paper and some blue paper.  With the larger molds, I started with the bead, and then kept adding paper twists and smoothing them out. 

The other two types I have here are a paper mache and a brown paper bag version that I will show you tomorrow. I also used yarn/string for a couple of wands, but didn't really like the way those worked out so didn't make very many.

This is a real paper mache wand. After using the materials I did, I begin to think that you could really use any kind of paper and sturdy glue. I think the old school version of flour and water might not work so well, but there are many other glues that might. I liked that the white glue was so cheap and easily available, because I did use a lot, maybe two or three smallish bottles. I should have gotten one of those big jugs of glue, but I wasn't aware that I would be using so much. 

So that's it. Paper and glue and skewers and paint. And not that complicated. It's definitely something most people could do, although younger kids would need help with a few aspects. It's also super cheap. If I hadn't been making so many, I would have been fine with materials I had around the house, some recycled. But as it was, I bought some extra glue and some extra craft paint, rather than using my more expensive fluid acrylics (which I think actually work better.)

I hope you enjoyed it. If you try these wands, I'd love to see a link to what you create. Or if you manage different versions with different techniques. Paper clay? A base of a garden twig? Embellished with gemstones? It's so much fun, I encourage experimentation.

For more on how I embellished the 21 Harry Potter wands, go here

Friday, July 27, 2012

Harry Potter Sugar Mice with Sour Sghetti Tails


Sugar Mice for a Harry Potter Party

In my search for sweets for my son's Harry Potter party, I fixated on a few things. Chocolate frogs,butterbeer, and these sugar mice.


I've looked through quite a few recipes, looking for something that was easy, inexpensive and tasty. I learned that real sugar mice, classically, use cotton strings for the tail. But in some of the recipes I found, they had licorice strings. I realized that I had already packages of "sour sghetti" that I got on sale and they would be perfect. I also found some recipes that were basically fondant.... like the kind people frost wedding cakes with. Those were all pretty high maintenance recipes. In the end, I decided to go for the simplest. I didn't use a sugar mice recipe at all, rather I went for a butter mint recipe, but I skipped the mint entirely, and flavored it with vanilla, since I knew I would be using the sour sghetti, I thought plain sugar mice would go better with the fruity sour taste than mint.

Vanilla Sugar Mice

1/4 cup softened butter.
1/3 cup sweetened condensed milk.
3 1/4 cup powdered sugar. 
1/4 tsp salt
1/2 tsp vanilla
sour 'sghetti or other long thin candy strings

Mix butter, condensed milk, vanilla and salt with a stand mixer or hand mixer until smooth. Add the sugar a little bit at a time and mix until it reaches a consistency of firm play dough. 

You might need to add more powdered sugar to make it stiffer or more condensed milk to soften it up. When it feels right, you can start modelling the mice.


 Here I've illustrated the process.

First I take out some sugar dough and roll it into long snakes.

Then divide the snakes into more or less even  pieces. You don't want the mice to be too big, because that's a lot of sugar for one bite, so aim for marble size ball.

Roll your pieces into marble balls.

Take your marble balls and press the end of your sghetti string into the ball.
Pinch the ball so that it surrounds the sghetti string.

Mold the squooshed piece into a pear shape, largest shape near the tail. Pinch the nose so it is vaguely mouse shaped.

Take two tiny dots of sugar dough, pinch them flat between your fingers and then pinch onto the mouse where the ears would be. Try to keep the dough warm/workable before you add the ears, because as it starts drying it gets less sticky. 

Poke tiny dots into the face of the mouse to serve as dots. You can also add tiny frosting eyes, but I thought the impressions worked fine.

And there is your mouse.

I even found that the extra step of adding the ears, while cute, isn't really necessary. They still look enough like mice when it is just the pear shaped dough with the eyeballs pressed in. I bet you could also use little round sprinkles as eyeballs, too. That would be cute.

Let them dry for a day or two to harden. And then serve to all the wizard wannabes.


Thursday, July 26, 2012

Everything Changes, thoughts on life and non-attachment

everything changes
acrylic and pitt artist pen on paper
5"x8"

I'm not really sure where this came from. I drew it last night in my journal and then painted it this morning.  Well, I painted over it because I didn't like how it turned out.

I was looking at a video of Maira Kalman and I think she inspired me.  I've seen her work before, but I don't think I ever really thought about the woman herself or her philosophy. Anyway, after watching her video and looking at some of the illustrations that went with it, this is what popped into my head. Actually I think I had a different idea, but it was really late and the idea that came to me first would have entailed taking out all my paints and setting up my palette and it was really late. I didn't actually have time to start a whole painting unless I wanted to be up until past 2 am... which I didn't.  So I grabbed some pitt artist pens and started drawing whatever came to mind.

This was the original drawing. I didn't really like the pink-y raindrops and as soon as I added the purple ones I knew I'd made a big mistake.

So this morning, I looked at it again, thinking I might have to scrap it all, and stopped.

I didn't have to accept it as a disappointment. All I had to do was adjust it.

I had that power.

I took out my white paint and painted right over it. A couple coats and it was gone, with only a shadow of the original mistake to prove that I'd learned something.

Then I added my familiar hatchmarks/raindrops/time ticks.

Do I love it? Well, it's not my favorite. But it doesn't have to be a masterpiece.

It reminds me that I am not doomed by the mistakes I have made. It reminds me that every day is another day where we have the ability to act and interact and adjust things and make them work better for us than they do today. The world does not have to remain where it is. In fact, the world never ever remains where it is. It's always turning, always changing. It might seem as if life is static, but that's an illusion that we like to keep because it makes us feel comfortable.

This whole post might seem to contradict yesterday's post where i talk about accepting the season you are living, but in reality, I don't think it does. The thing is, if you accept your life for what it is, you can then work on changing things that actually are there without all the emotional resentment and attachment to the outcome.

I do think that this is the Buddhist concept of non-attachment. It is something that I have struggled with my whole life, really, since I first remember watching an old Sinbad movie, where Sinbad asks the genie what wish he would grant if it were his choice, and the genie grants Sinbad happiness. I remember thinking, "But no! What if his life is no good?  He can't be happy with it! He has to change it!"

But there it is. My journey with the concept of non-attachment started with an old Sinbad movie-- or was it Aladdin? Anyway, I think I've started to come around to realizing that non-attachment does not mean you don't want anything, but that you are not attached to the outcome, your happiness is not dependent upon a certain result. Because the truth is, even if you get that desired outcome, it will never stay. Because life is not static and everything changes.

Everything changes, the good and the bad. If we accept that, and if we accept life as it changes, whether we are directing the changes consciously or just letting it happen, then we can find happiness, even as the world is spinning in seeming chaos.

Well. Those are deep thoughts for the morning. I now have to run and get ready for work. I hope I'm making sense. I'm not sure I'd make better sense if I sat for hours and struggled over every word.  I'm not really sure I have it completely straight in my head, but the thoughts are a process, too, and they too can change.

Wednesday, July 25, 2012

Living This Season As It Is

Working with the kids on papier mache Harry Potter wands.

The summer time is in midswing.

The days are long, stretching into the night. The heat is sweltering. School is out and the kids are home and looking for trouble.

In my mind, I think of summer and a time of relaxation, vacation and the opportunity to really get into projects I want to do.

But the reality is that, as the mother of two still young children, there is no vacation for me in summer.  This is not my vacation, but theirs. I am back on duty as a nearly full time stay at home mom. However my job outside of the home isn't lightened during these times, in fact, this is the busy season for us so my hours are a little longer at that, too.

The problem arises here, when my reality does not live up to my expectations. Just like when you go to a movie, expecting it to be AWESOME and it is just "meh." If you had sat down in the theater without those grand expectations, you would have enjoyed the movie, called it "fun" and been pleasantly surprised. But because you believed it should be something more, something other than what it was, you get cranky, and dissatisfied.

So my summer is like a blockbuster movie that failed to live up to my expectations. I thought I would get back to writing, whip my house into shape, shape up that fabulous Harry Potter party for the boy, paint every day, build my etsy shop into a behemoth, keep my kids from the summer slide and create fabulous games and activities for them every day.

Really... there are still only 24 hours in the day, and there was no way my summer could live up to these grand expectations. Especially since with every goal that I did not meet, I got more and more disgruntled, pouty, even.

This is not the fault of my summer.  The summer is what it is. The kids are running wild and watching far too much tv. I am going to work 5 days a week and coming home 3-6 hours later. The pumpkin seeds we planted are a bust. The kids' reading program plans lost steam, slumping along like summer slide fashion. I have far less time to myself as I am waking up later, since the kids don't need to get to school early and the kids are staying up later with the sun, so that means writing is pretty much out. I can do some creative things while the kids are with me, but I can not get the focus together to really write intensely when the girl wants my attention every 5 minutes and I am refereeing sibling fights every other 5 minutes.

OK.

Well the point of all this is that in order to be productive and enjoy the life that we have, we must accept the season that we are living. This season is summer. It is not the summer of my childhood, with endless days stretching out unmarked (or it isn't for me, that's MY kids' summer.) Nor is it the summer of my teaching days, when my hard work during the year was punctuated by glorious days where I could write and paint and really get down to the work that I had to put aside during the work year.

No, this is the busy mom summer I have. To accept it as THIS summer, means I don't expect it to be the lazy summer of my childhood, or the painting/writing summer of my pre-child days. To accept it as THIS summer means I enjoy making crafts with my kids, or staying up late with them, watching favorite movies from my own child hood (that's right, ET, I'm talking to you). It means researching and experimenting with ideas that will create my son's dream Harry Potter party, even if I think I should go even farther and make it even fancier, even though I am not a professional party planner with unlimited resources and dedicated time. Accepting this summer as it is means letting myself be lazy sometimes, and not expecting constant productivity.

Perhaps it also means letting go of the disappointment that I am not in another season, where I can do each and everything on my dream to do list.

The dream to do list is not about reality, see? So why hold onto it? Why not just accept that this is my season, and the best I can do is to make it the best season it can be, to appreciate it for what it is.

What season are you in right now? Are you accepting it for what it is, or are you wishing for some other summer? Some other springtime or autumn?

Tuesday, July 24, 2012

Be Who You Want To Be

be who you want to be
ink and watercolor on paper
7"x7"

Don't wait for life to be perfect and the circumstances to be set up just right and the stars to align to be the person you want to be.

Be who you want to be right now.

It's not about what you have or what you do, it's about what you are. It's about how you feel about yourself and how you present yourself to the world. What kind  of person do you want to be? What calls to you? What makes you feel fulfilled? Who is the kind of person you want to be?

Just be.

Remember that if you have the desire to be that person, then you have the ability inside of you already.

This is not a thing that comes from the outside. It's not about "what" you are. Not a job or profession or title, those are things that you do. It's not about money or possessions. Those are things you have. This is who you are, inside. This is where you put your energy and your focus. This is what you love and desire.

If you want to be patient, kind and focused... be patient kind and focused.

If you want to be passionate, creative and adventurous... be passionate, creative and adventurous.

If you want to be organized, nurturing and loving... be those things.

When you are living into who you want to be, then you can DO those things that you want to do. When you are being who you want to be, and doing what you want to do, then you can HAVE those things you want to have.

This is a shift in perspective that can change the way you view your life. Look inward for your success, strengthen your being so that you can do the things you need to do to have the things you want to have.

It's not the other way around. It's not about having stuff so you can do stuff and that then will make you happy with who you are.

You have to be happy with yourself first, or it's all built on a house of cards.

And as we all know, those card houses... they can come tumbling down at a moments notice.

Start this way:  Make a list of the qualities you would like to have. Write a few pages in your journal or a notebook about the person you would like to be and how those qualities would help you be that person. Think about how being that person would make you feel about yourself. Now write down three things you could do to BE that person, right now. Give it a try. Practice being the person you want to be.

Monday, July 23, 2012

Hand-Made Harry Potter Invites

Hogwarts Party Invitations
Tea Stained Paper
Calligraphy Pen with Brown Ink
Handmade Hogwarts Stamp
Rolled into a Scroll and Tied with Twine

For my son's party invitations, I wanted to make it so that it would look like something that might actually be sent from Hogwarts. Rather than a folded letter and wax seal (since my sealing wax and imprints are off in storage somewhere) I decided to go with a scroll.

I wanted to approximate the look and feel of old parchment that has been sitting in a wizard's workshop for ages, so I took plain copy paper, cut it in half, and then soaked it in a baking pan filled with strong spice flavored tea. I actually really liked the scent that the spice tea added... sort of like something that would go into a potion. And the tea soak also gave the paper a different, almost crispy feel. However, the tea alone only gave it a pale color, so I added about 3 cups of strong coffee to the tea bath. I think that contributed to the variation of color on each page. Each page looks slightly different which works with the wizard-made feel.

This is the one page that I left whole. I like the way it looks two toned, but I haven't used this one yet. When the pages looked good, I took them out of the tea/coffee bath and laid them out on the deck, in the sun. I've been looking for a photo, but I guess I either forgot to take one, or I deleted it for some reason. Oh well. It's a simple process. Soak paper. Lay out flat to dry.  I could have just used the paper as the background and photocopied one letter.... but I liked the individual aspect of handwriting each letter.

Rather than a quill, I used a calligraphy pen with brown ink. It turns out the Hogwarts letters are actually in green ink, but as this is an invitation, I thought brown would do. I did not worry abut using perfect calligraphy. I'm a busy wizard, with spells to cast and potions to mix.  I got the idea for the wording from this site, and I wrote out the Hogwarts Heading, using my personal stamp to make it official.

I rolled up my invitations and tied them with cotton twine. For a little while I was toying with the idea of dipping the ends of the twine in gold paint, but I decided I liked the plain scrolls.

I found this invitation with owl and accessories on pinterest and thought it would be really cool to deliver these scrolls with an owl, but to be honest, I have to draw the line somewhere. I'm making owls to give away during the party and I need those extra few weeks on that project. And of course there's the idea of attaching the invites to white helium balloons that have owls drawn on them... but I was okay with just having G's stuffed owl supervise the delivery.

Let's just say that although I didn't deliver all the invites personally, I think the recipients were pretty delighted to get them, just the way they were.

Stay tuned for more Harry Potter Party crafts. The things you can do are almost endless and it is super hard to limit the tasks you set for yourself... if you are hosting a HP party.


Thursday, July 19, 2012

Lady of Flowers, or She Becomes What She Believes


Lady of Flowers or She Becomes What She Believes 
acrylic on watercolor paper 
3"x4" 

I drew this lady last night while watching so you think you can dance.

Then I painted her this morning while my kids ran around playing.

I'm trying to paint more. I'm also trying to utilize my time better. I'm trying to make things that will make my better. I'm trying to be in the present moment. And I am trying to be the person I want to be and live the life I want to live.  I'm trying to focus on the positives and good things and creativity. Focus on what is working, rather than what is not working or what is missing.

Be who you want to be.

Do what makes you feel fulfilled.

Believe that things will work out, one way or another.

Look for bounty and the world will be bountiful.

Give your energy and your focus to the things that get you where you want to go.

And then never give up, even when it seems that none of that is working.


Wednesday, July 18, 2012

Simplified Hogwarts Crest Stamp

 Hogwarts Stamp, hand carved.

In preparation for my son's upcoming Harry Potter birthday party, I made a stamp to make things "official" and Wizardish.  Now really, I made it for the invites, but I think I might be able to use it for lots of things, paper cups and potion labels and napkins and favors and ... oh who knows.

This crest was actually inspired by this tattoo, that I found on pinterest. The real Hogwarts Crest is quite involved and detailed and the stamp I needed was about an inch high. So all that detail wasn't going to happen.
Here is what it looks like when stamped.

I used red, green, blue and yellow colored pencil to color in the appropriate house colors and I think it came out pretty well.

I'm trying to remember that this Harry Potter party is for 7 year olds and I don't have to go at it as if it were part of a movie set.

Sometimes I have a tendency to go overboard and want to make everything perfect, but one of the keys to being successfully creative is to understand your constraints. Also, simplicity is best.

My constraints are that it has to not cost very much, and that it has to all be done in the next few weeks without me going crazy.   The last part of that is the one I have to be the most concerned about. That is why I am looking for simplified versions of many Harry Potter crafts and decorations. OMG. I totally forgot about decorations. Sigh. I'd better re check my to do list and double check it up against the calendar, and decide where I can cut things and what things are necessary.

Remember, simplicity is best. Some snacks, some games and some favors, and every thing else is about kids running around like lunatics. Now remind me not to escalate this party with my must-do creative brainstorms so that I overburden myself in the coming weeks and are then left exhausted and burnt out in the wake of what was supposed to be fun.

Tuesday, July 17, 2012

Refashioned Skirt: Bleach Stripes DIY


Bleach striped skirt, 
refashioned from a stretchy old black pencil skirt 

I have been mulling over the creation of this skirt for quite some time, wondering how I could manage this. I've been researching ideas on pinterest and putting them on my do it yourself upcycled tshirt board. I know it says t-shirt and this is a skirt, but I play fast and loose like that with my board titles. It's really about upcycling old clothes. Which is what I did here. And again, I did it fast and loose. Hey, I guess it's my thing.


 First I picked my item to upcycle. I was originally thinking I could turn a striped tshirt into a skirt, but when I realized I already had a black skirt I rarely wore and was willing to sacrifice if it didn't turn out right, my decision was made. I took my skirt and found a flattened cardboard box that was approximately the same dimensions. Then I slid the skirt over the flattened box and straightened out all the wrinkles. I taped the stripes out on the skirt, using packing tape. I've heard painters tape and duct tape can also work, but I was worried about the duct tape pulling the fabric of the skirt, and I didn't have any painters tape.


I took my whole skirt/cardboard/tape contraption out onto the back deck, laid down some newspapers to keep the mess contained and took out the bleach. Warning: Also wear clothes that you do not mind ruining with bleach stains.  You can see my bleach mixture here, in the tupperware. It's about 50/50 bleach and water. I played it safe, since I've never done this with bleach before and I didn't want to ruin the fabric with a bleach that was too strong. I had a nice new paintbrush to use, and it worked perfectly for my purposes. And yes, I probably should have used gloves, but I barely touched any bleach and had no problem without gloves. I didn't even get any bleach on my clothes. This time, at least. Oh. P.S. I did this outside. Make sure you have good ventilation and your work area is covered/safe from bleach splashes. This projects has the potential to be tragically and permanently messy. Be careful. This is not a project for kids.


 So here I am beginning to paint on the bleach. I saturated the hem and moved onto the next stripe. You can see the bleach already beginning to work, lightening the bottom stripe to brown. Forgive the off kilter photos here, I had a bleach brush in one hand and a camera in the other and was starting to panic when I saw the color start to change so soon. I sped through the stripes, making sure to saturate the bleach through any wrinkles. I was okay with it if it didn't come out perfectly. My original plan here was to paint the stripes on without the tape, but I'm glad I used the tape. It kept me from panicking even more and gave me a guide, and kept the bleach off of the areas I wanted to keep black.


 After I finished bleaching the stripes on one side of the box, I flipped the box/skirt over. You can see at the sides that the bleach has already taken out a lot of the black dye.

 Here is the back side of the skirt after I bleached it.

At this point, my panic took over again. I wasn't sure how the bleach would react and was afraid of leaving it on too long and causing the fabric to burn away. I yanked the cardboard out of the skirt and pulled off the tape... luckily, it mostly came off all at once when the cardboard came out. I tossed the cardboard and the wad of tape to the side and ran to the kitchen sink to rinse out all the bleach.


Here she is rinsed and laid out on the porch for a photo. The stripes are irregular, but still stripey. The bleach bled under the tape, but not too much. In retrospect, I wonder if I should have put the bleach on when the skirt was already wet. I bleached the dry skirt. (update from Jill Plumley. DON'T wet the fabric first or the bleach will spread to all the wet areas. Thanks Jill.) Also in retrospect, I think I would have gone over the whole skirt with another layer of bleach. If you'll notice, the sides of the skirt where the front bleach and back bleach overlapped are a bit paler.

I also would not have been so conservative with my bleach. I might have used a stronger bleach solution and I would have left the bleach on longer for a lighter stripe. I suppose I was worried that the bleach would bleed all the way and remove all of the black. 

But in the end, I was satisfied with my experiment, even if it isn't a white/black skirt and it didn't quite turn out how I expected. I think I will wear this skirt a lot more now than I did when it was pure black.

Here is the back side of the skirt. This was an accidental photo. It turns out, it's kind of hard to photograph your own outfit. The first photo was actually taken by my 5 year old daughter after a tiny bit of tutoring. It's not so bad. Yay, Ivy.  She actually enjoyed taking my fashion photo so much that she said, "take a picture of me!" and did a whole photo shoot. Actually, she might like being in front of the camera better than being behind the camera. 
Here she is, the supermodel. I would like you to note, that she styled her own outfit and the skirt she is wearing is her favorite skirt, which is an upcycled skirt I made her, posted here

I'm wondering if any of you have any experience working with bleach. Do you have any hints or tips?
Related Posts Plugin for WordPress, Blogger...